Tag: Visual edit |
|||
| (141 intermediate revisions by 63 users not shown) | |||
| Line 1: | Line 1: | ||
| − | [[file:Secret Room Door.png |
+ | [[file:Secret Room Door.png]] |
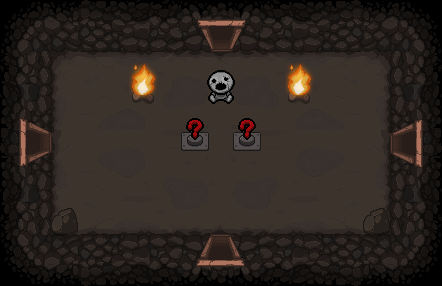
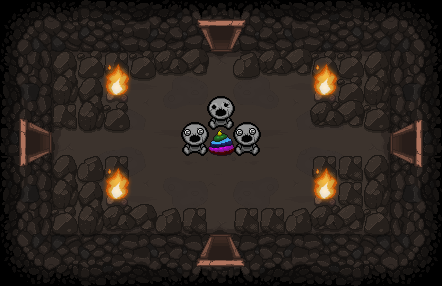
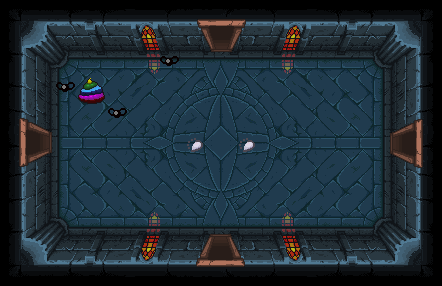
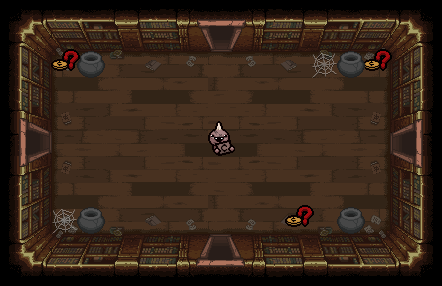
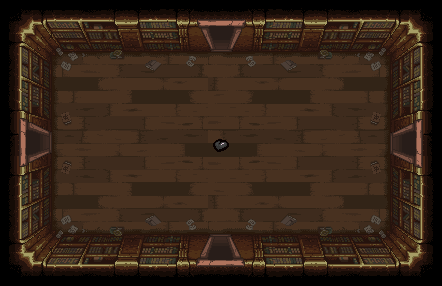
| + | {{r|Secret Room}}s are rooms that are not normally visible on the map and are usually accessed by bombing a wall leading to them. Regular Secret Rooms are usually located next to 3 or 4 rooms, while {{r|Super Secret Room|no link}}s can only be next to one room; they are placed on one of the dead ends generated on the map, similar to other Special Rooms. Very rarely, the regular '''Secret Room''' may also be located next to only one room. Entrances to Secret Rooms will never have rocks or gaps in the way. Secret Rooms usually contain at least one {{E|Shopkeeper}}. Secret Rooms stay open after bombing them. |
||
| + | == Variations == |
||
| − | '''Secret Rooms''' are rooms that are not normally visible on the map and must be bombed into to access. Regular secret rooms are usually located next to 2 to 4 rooms, while super secret rooms can only be next to one room. Very rarely, the regular secret room may also be located next to only one room. Entrances to Secret Rooms will never have rocks or gaps in the way. Secret Rooms usually contain at least one [[shopkeeper]]. Secret Rooms stay open after bombing them. |
||
| + | The following room maps were made using Basement Renovator<ref>https://github.com/Tempus/Basement-Renovator</ref> for cleaner viewing; note that all [[Urn]]s you see will be [[Mushroom]]s when encountered in-game. |
||
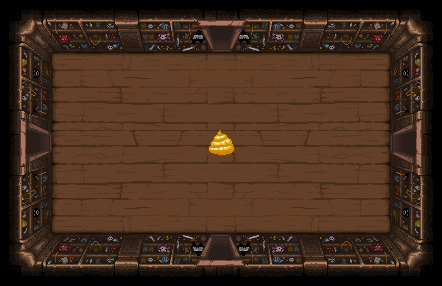
| − | == Possible |
+ | === Possible Layouts === |
| + | {| class="wikitable mw-collapsible mw-collapsed sortable striped" style="text-align: center" |
||
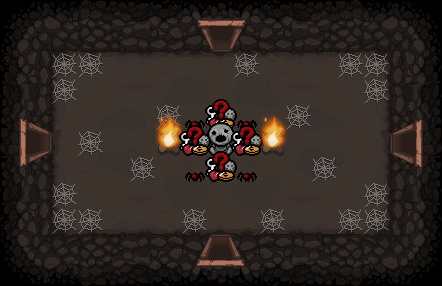
| − | * 3, 6, or 9 [[Penny|pennies]] |
||
| + | ! ID |
||
| − | * A [[Slot Machine]] |
||
| + | ! Weight |
||
| − | * 3 random [[pickup]]s |
||
| + | ! class="unsortable" | Contents |
||
| − | * 2 [[TNT]] barrels and a [[chest]] |
||
| + | ! class="unsortable" | Image preview |
||
| − | * 3 [[pills]] |
||
| + | |- |
||
| − | * 3 [[bomb]] pickups |
||
| + | | 0 |
||
| − | * A [[Batteries#Lil.27_Battery|lil' battery]] |
||
| + | | 1.0 |
||
| − | * 2 [[keys]] |
||
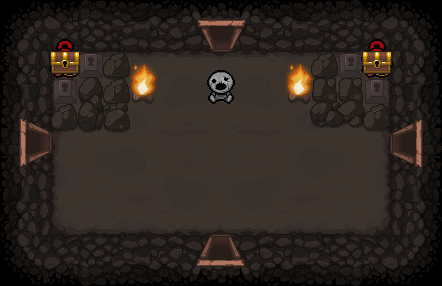
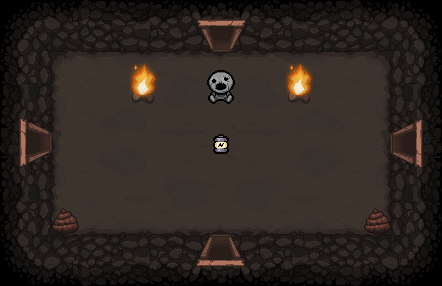
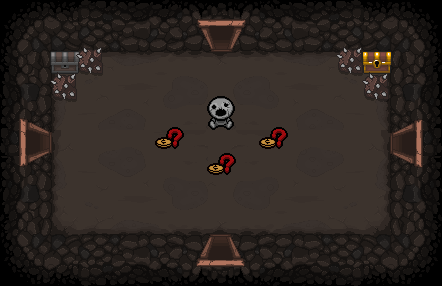
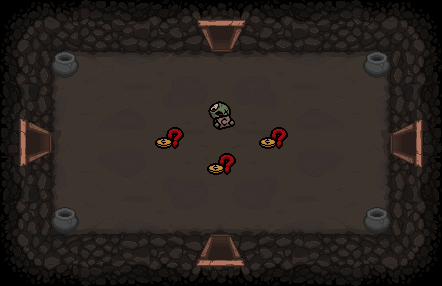
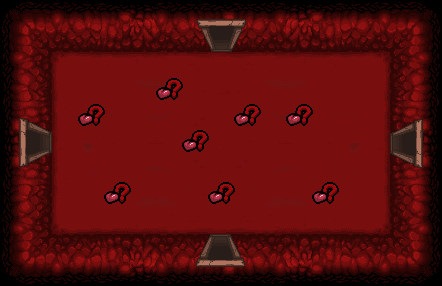
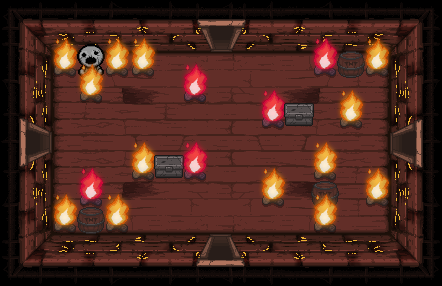
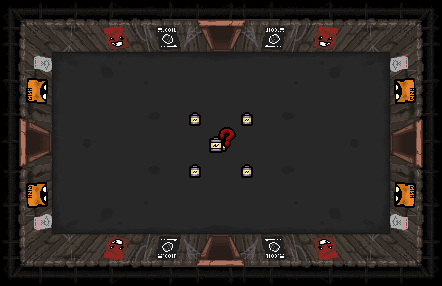
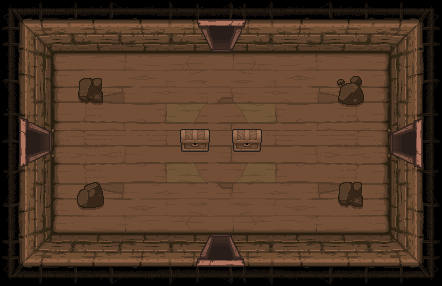
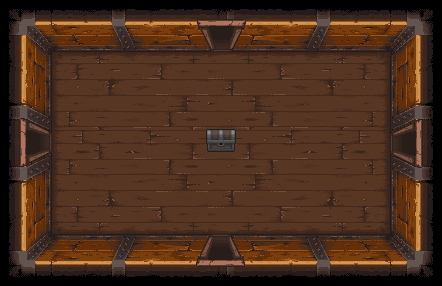
| + | | style="text-align: left" | 1 {{E|Shopkeeper}}, 2 {{E|Fire Place}}s, and 1 [[Secret Room (Item Pool)|Secret Room item]]. |
||
| − | * 2 bomb pickups and 4 shopkeepers |
||
| + | | [[File:SecretRoom 0.png|250px]] |
||
| − | * A key and a [[Key Master]] |
||
| + | |- |
||
| − | * A [[golden poop]] and 3 shopkeepers |
||
| + | | 1 |
||
| − | * 20 [[Rocks#Mushrooms|mushrooms]] and a 1+1 free bomb |
||
| + | | 1.0 |
||
| − | * A [[corny poop]] |
||
| + | | style="text-align: left" | 1 Shopkeeper, 2 Fire Places, and 3 random [[Coin]]s. |
||
| − | * 10 mushrooms |
||
| + | | [[File:SecretRoom 1.png|250px]] |
||
| − | * 4 [[spiders]] and random pickups |
||
| + | |- |
||
| − | * An [[item]] from the [[Secret_Room_(Item_Pool)|secret room pool]] |
||
| + | | 2 |
||
| − | * An item behind pits, [[rocks]], [[Fire_Places|fires]], [[spikes]], and/or [[Blocks#Iron_Blocks|iron blocks]], and 6 shopkeepers |
||
| + | | 1.0 |
||
| − | * 2 random pickups behind rocks and [[Blocks#Key_Blocks|key blocks]] |
||
| + | | style="text-align: left" | 1 Shopkeeper, 2 Fire Places, 4 Rocks and 6 random [[Coins]]. |
||
| − | * A [[nickel]] and 3 shopkeepers |
||
| + | | [[File:SecretRoom 2.png|250px]] |
||
| − | * {{dlc|a}} 1-2 [[Reward Plate]]s |
||
| + | |- |
||
| − | * {{dlc|a+}} A [[sack]] and a [[Restock Machine]] |
||
| + | | 3 |
||
| − | * {{dlc|a+}} 2 sacks |
||
| + | | 1.0 |
||
| − | * {{dlc|a+}} 6 mushrooms and a troll bomb next to the shopkeeper |
||
| + | | style="text-align: left" | 1 Shopkeeper, 2 Fire Places, 4 Rocks, and 9 random [[Coins]]. |
||
| − | * {{dlc|a+}} An item, two chests, and 3 [[Fly#Black_Fly|black flies]] |
||
| + | | [[File:SecretRoom 3.png|250px]] |
||
| − | * {{dlc|a+}} An item behind iron blocks, 4 [[Fire_Places#Purple_Fire_Place|purple fires]], and 5 shopkeepers |
||
| + | |- |
||
| − | ** Random pickups in secret rooms have a rare chance to be replaced by items from the secret room pool. |
||
| + | | 4 |
||
| − | ** On Caves 2 and later, [[Greed]] and [[Super Greed]] have a chance to replace secret rooms. |
||
| + | | 1.0 |
||
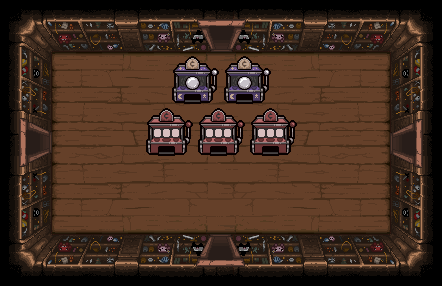
| + | | style="text-align: left" | 1 Shopkeeper, 4 Rocks, and 1 {{m|Slot Machine}}. |
||
| + | | [[File:SecretRoom 4.png|250px]] |
||
| + | |- |
||
| + | | 5 |
||
| + | | 1.0 |
||
| + | | style="text-align: left" | 1 Shopkeeper, 5 Mushrooms, 4 Cobwebs, and 3 random Pickups. |
||
| + | | [[File:SecretRoom 5.png|250px]] |
||
| + | |- |
||
| + | | 6 |
||
| + | | 1.0 |
||
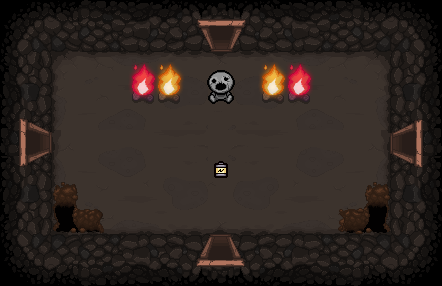
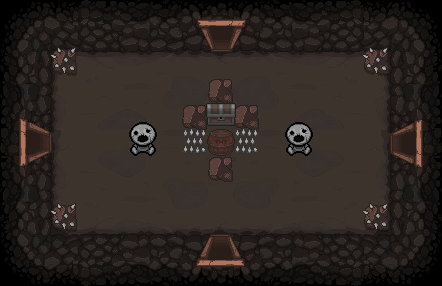
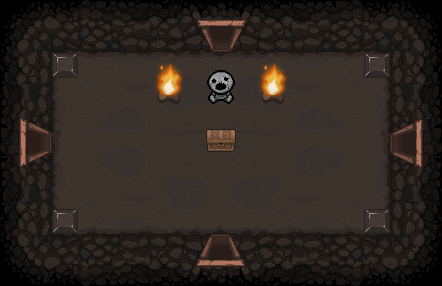
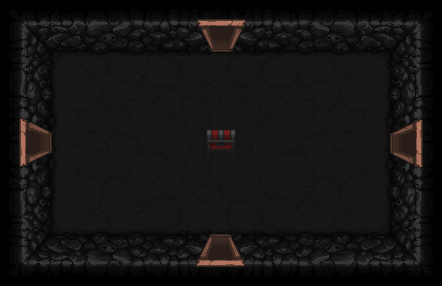
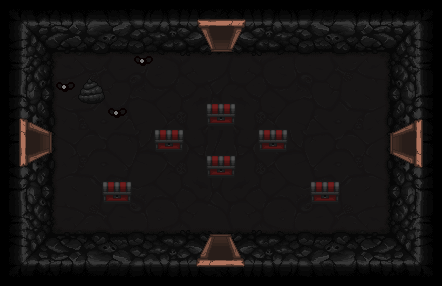
| + | | style="text-align: left" | 1 Shopkeeper, 2 {{E|TNT}}, 4 Rocks, and 1 {{E|Chest}}. |
||
| + | | [[File:SecretRoom 6.png|250px]] |
||
| + | |- |
||
| + | | 7 |
||
| + | | 1.0 |
||
| + | | style="text-align: left" | 1 Shopkeeper, 2 Mushrooms, and 3 random [[Pill]]s. |
||
| + | | [[File:SecretRoom 7.png|250px]] |
||
| + | |- |
||
| + | | 8 |
||
| + | | 1.0 |
||
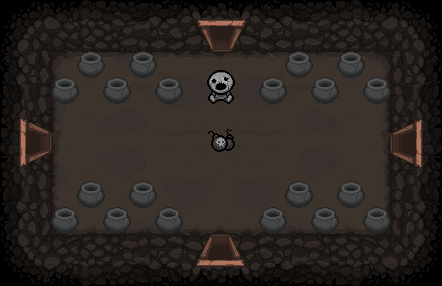
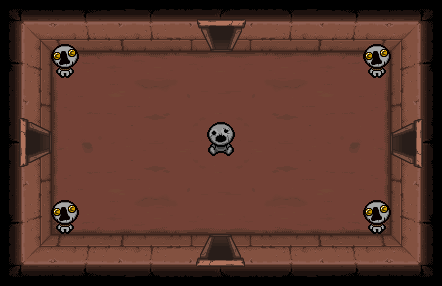
| + | | style="text-align: left" | 1 Shopkeeper surrounded by 4 Cobwebs, and 3 random [[Coins]]. |
||
| + | | [[File:SecretRoom 8.png|250px]] |
||
| + | |- |
||
| + | | 9 |
||
| + | | 1.0 |
||
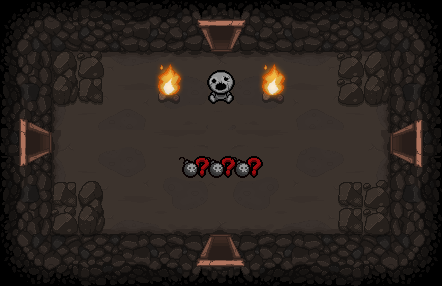
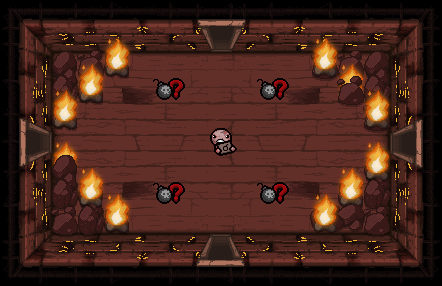
| + | | style="text-align: left" | 1 Shopkeeper, 2 Fire Places, 4 Rocks in each corner, and 3 random {{E|Bomb}} pickups. |
||
| + | | [[File:SecretRoom 9.png|250px]] |
||
| + | |- |
||
| + | | 10 |
||
| + | | {{dlc|nr}}<br>1.0<br>{{dlc|r}}<br>0.75 |
||
| + | | style="text-align: left" | 1 Shopkeeper, 2 Fire Places, 2 Red Fire Places, and a {{E|Lil' Battery}}. |
||
| + | | [[File:SecretRoom 10.png|250px]] |
||
| + | |- |
||
| + | | 11 |
||
| + | | 1.0 |
||
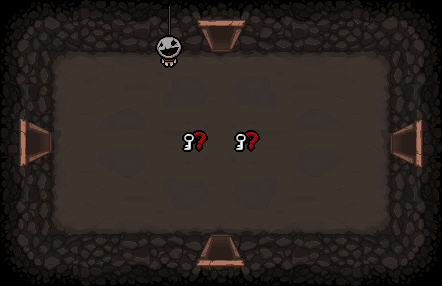
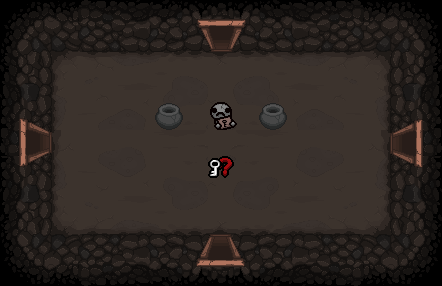
| + | | style="text-align: left" | 1 Shopkeeper, and 2 random {{E|Key}} pickups. |
||
| + | | [[File:SecretRoom 11.png|250px]] |
||
| + | |- |
||
| + | | 12 |
||
| + | | 1.0 |
||
| + | | style="text-align: left" | 4 Shopkeepers, 1 Red Fire Place, and 2 random Bomb pickups. |
||
| + | | [[File:SecretRoom 12.png|250px]] |
||
| + | |- |
||
| + | | 13 |
||
| + | | 1.0 |
||
| + | | style="text-align: left" | 1 {{m|Key Master|d}}, 2 Mushrooms, and 1 random Key pickup.<br>{{dlc|nr}} This is the only Secret Room that doesn't have a Shopkeeper. |
||
| + | | [[File:SecretRoom 13.png|250px]] |
||
| + | |- |
||
| + | | 14 |
||
| + | | {{dlc|nr}}<br>1.0<br>{{dlc|r}}<br>0.5 |
||
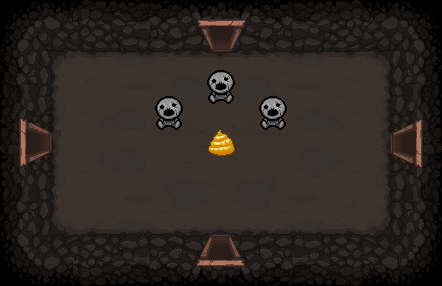
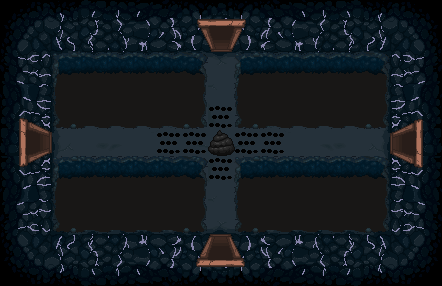
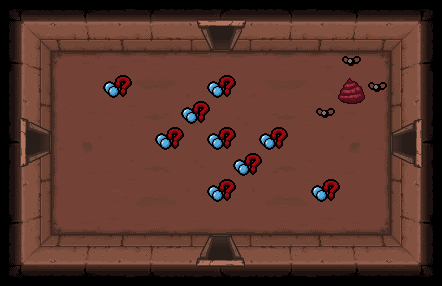
| + | | style="text-align: left" | 3 Shopkeepers, and 1 {{E|Golden Poop}}. |
||
| + | | [[File:SecretRoom 14.png|250px]] |
||
| + | |- |
||
| + | | 15 |
||
| + | | 1.0 |
||
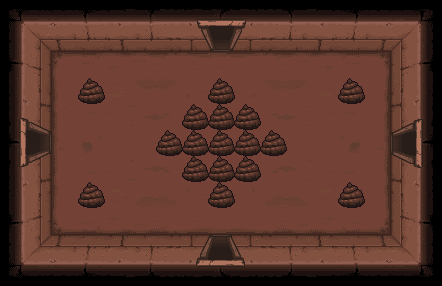
| + | | style="text-align: left" | 1 Shopkeeper, 20 Mushrooms, and 1 {{E|Double Bomb}}. |
||
| + | | [[File:SecretRoom 15.png|250px]] |
||
| + | |- |
||
| + | | 16 {{dlc|a}} |
||
| + | | {{dlc|nr}}<br>1.0<br>{{dlc|r}}<br>0.25 |
||
| + | | style="text-align: left" | 1 Shopkeeper, 2 Fire Places, and 1 Corny Poop. |
||
| + | | [[File:SecretRoom 16.png|250px]] |
||
| + | |- |
||
| + | | 17 {{dlc|a}} |
||
| + | | {{dlc|nr}}<br>1.0<br>{{dlc|r}}<br>0.25 |
||
| + | | style="text-align: left" | 1 Shopkeeper, 2 Fire Places, 2 Rocks, and 2 {{E|Reward Plate}}s. |
||
| + | | [[File:SecretRoom 17.png|250px]] |
||
| + | |- |
||
| + | | 18 {{dlc|a}} |
||
| + | | 1.0 |
||
| + | | style="text-align: left" | 1 Shopkeeper, 2 Fire Places, 20 Cobwebs, 4 {{E|Spider}}s, and 4 random pickups. |
||
| + | | [[File:SecretRoom 18.png|250px]] |
||
| + | |- |
||
| + | | 19 {{dlc|a}} |
||
| + | | {{dlc|nr}}<br>1.0<br>{{dlc|r}}<br>0.5 |
||
| + | | style="text-align: left" | 2 Shopkeepers in the upper 2 corners, with 4 more plus a [[Secret Room (Item Pool)|Secret Room item]] on the other side of several gap in the floor. There are four obstacles that have equal, independent chances of being [[Blocks]], Fire Places, Rocks, and/or [[Spikes]]; if they are Rocks, they can be bombed to bridge the gap and allow access to the room's center. |
||
| + | | [[File:SecretRoom 19.png|250px]] |
||
| + | |- |
||
| + | | 20 {{dlc|a}} |
||
| + | | {{dlc|nr}}<br>1.0<br>{{dlc|r}}<br>0.25 |
||
| + | | style="text-align: left" | 1 Shopkeeper, 2 Fire Places, and 1 Reward Plate. |
||
| + | | [[File:SecretRoom 20.png|250px]] |
||
| + | |- |
||
| + | | 21 {{dlc|a+}} |
||
| + | | 1.0 |
||
| + | | style="text-align: left" | 1 Shopkeeper, 2 Fire Places, and several Rocks and Key Blocks blocking access to 2 rewards in the upper corners. The rewards have equal, independent chances of being Chests, {{E|Locked Chest}}s, {{E|Grab Bag}}s, [[Secret Room (Item Pool)|Secret Room items]], and/or random pickups. |
||
| + | | [[File:SecretRoom 21.png|250px]] |
||
| + | |- |
||
| + | | 22 {{dlc|a+}} |
||
| + | | 1.0 |
||
| + | | style="text-align: left" | 3 Shopkeepers, 2 Fire Places, and 1 {{E|Nickel}}. |
||
| + | | [[File:SecretRoom 22.png|250px]] |
||
| + | |- |
||
| + | | 23 {{dlc|a+}} |
||
| + | | {{dlc|nr}}<br>1.0<br>{{dlc|r}}<br>0.5 |
||
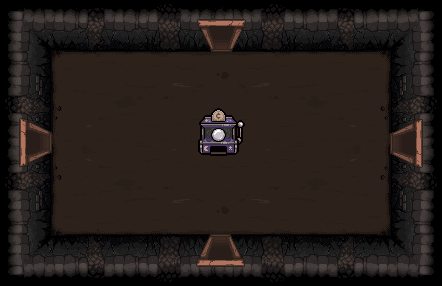
| + | | style="text-align: left" | 1 Shopkeeper, 2 Fire Places, 1 Grab Bag, and 1 {{m|Shop Restock Machine|d}}. |
||
| + | | [[File:SecretRoom 23.png|250px]] |
||
| + | |- |
||
| + | | 24 {{dlc|a+}} |
||
| + | | {{dlc|nr}}<br>1.0<br>{{dlc|r}}<br>0.25 |
||
| + | | style="text-align: left" | 1 Shopkeeper, 2 Blocks, and 10 Mushrooms. |
||
| + | | [[File:SecretRoom 24.png|250px]] |
||
| + | |- |
||
| + | | 25 {{dlc|a+}} |
||
| + | | {{dlc|nr}}<br>1.0<br>{{dlc|r}}<br>0.5 |
||
| + | | style="text-align: left" | 1 Shopkeeper, 2 Fire Places, and 2 Grab Bags. |
||
| + | | [[File:SecretRoom 25.png|250px]] |
||
| + | |- |
||
| + | | 26 {{dlc|a+}} |
||
| + | | {{dlc|nr}}<br>1.0<br>{{dlc|r}}<br>0.5 |
||
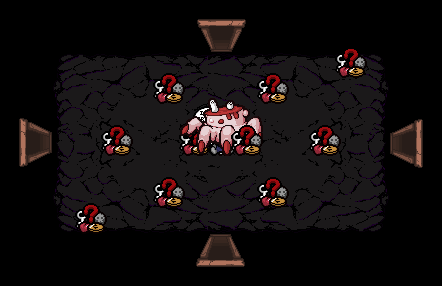
| + | | style="text-align: left" | 1 Shopkeeper, 2 Fire Places, 2 Poops, 6 Mushrooms, and 1 {{E|Troll Bomb}} which will blow up 3 of the Mushrooms and the Shopkeeper. |
||
| + | | [[File:SecretRoom 26.png|250px]] |
||
| + | |- |
||
| + | | 27 {{dlc|a+}} |
||
| + | | {{dlc|nr}}<br>1.0<br>{{dlc|r}}<br>0.25 |
||
| + | | style="text-align: left" | 1 Shopkeeper, 2 Fire Places, and 2 {{E|Reward Plate}}s. |
||
| + | | [[File:SecretRoom 27.png|250px]] |
||
| + | |- |
||
| + | | 28 {{dlc|a+}} |
||
| + | | 0.1 |
||
| + | | style="text-align: left" | 1 Shopkeeper, 2 Fire Places, 2 {{E|Chest}}s, 1 Poop surrounded by 3 {{E|Fly|display=Flies}}, and 1 [[Secret Room (Item Pool)|Secret Room item]]. |
||
| + | | [[File:SecretRoom 28.png|250px]] |
||
| + | |- |
||
| + | | 29 {{dlc|a+}} |
||
| + | | 0.1 |
||
| + | | style="text-align: left" | 5 Shopkeepers, and 1 [[Secret Room (Item Pool)|Secret Room item]] behind 4 Blocks and 4 Purple Fire Places. |
||
| + | | [[File:SecretRoom 29.png|250px]] |
||
| + | |- |
||
| + | | 30 {{dlc|r}} |
||
| + | | 0.1 |
||
| + | | style="text-align: left" | 1 Shopkeeper, 2 Fire Places, 2 Poops, and 1 {{E|Mega Battery|x}}. |
||
| + | | [[File:SecretRoom 30.png|250px]] |
||
| + | |- |
||
| + | | 31 {{dlc|r}} |
||
| + | | 0.25 |
||
| + | | style="text-align: left" | 1 Shopkeeper, 4 Fire Places, 44 Rocks, and 1 {{E|Rainbow Poop}}. |
||
| + | | [[File:SecretRoom 31.png|250px]] |
||
| + | |- |
||
| + | | 32 {{dlc|r}} |
||
| + | | 1 |
||
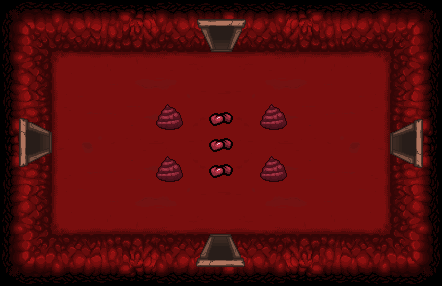
| + | | style="text-align: left" | 1 Shopkeeper, 2 Poops, 10 Mushrooms, and 5 random [[Coins]]. |
||
| + | | [[File:SecretRoom 32.png|250px]] |
||
| + | |- |
||
| + | | 33 {{dlc|r}} |
||
| + | | 0.5 |
||
| + | | style="text-align: left" | 2 Shopkeepers, 4 Fire Places, 2 Rocks, and 3 Mushrooms and 1 rock which surround 1 random [[Card]]. |
||
| + | | [[File:SecretRoom 33.png|250px]] |
||
| + | |- |
||
| + | | 34 {{dlc|r}} |
||
| + | | 0.5 |
||
| + | | style="text-align: left" | 2 Shopkeepers, 2 Fire Places, 1 Spiked Rock in each corner, and 1 [[Secret Room (Item Pool)|Secret Room item]] behind Blocks, Key Blocks, and Spikes. |
||
| + | | [[File:SecretRoom 34.png|250px]] |
||
| + | |- |
||
| + | | 35 {{dlc|r}} |
||
| + | | 1 |
||
| + | | style="text-align: left" | 1 Shopkeeper, 3 random [[Coins]], along with 1 {{E|Chest}} and 1 {{E|Locked Chest}} each in the upper corners that are both blocked by 2 Spiked Rocks. |
||
| + | | [[File:SecretRoom 35.png|250px]] |
||
| + | |- |
||
| + | | 36 {{dlc|r}} |
||
| + | | 1 |
||
| + | | style="text-align: left" | 2 Shopkeepers, 1 Spiked Rock in each corner, and 1 random Chest that is surrounded by Rocks, which can be destroyed with 1 nearby {{E|TNT}} which is itself behind Spikes on each side. |
||
| + | | [[File:SecretRoom 36.png|250px]] |
||
| + | |- |
||
| + | | 37 {{dlc|r}} |
||
| + | | 0.5 |
||
| + | | style="text-align: left" | One {{m|Rotten Beggar|d}}, 4 Mushrooms, and 3 random [[Coin]]s. |
||
| + | | [[File:SecretRoom 37.png|250px]] |
||
| + | |- |
||
| + | | 38 {{dlc|r}} |
||
| + | | 0.5 |
||
| + | | style="text-align: left" | 1 Shopkeeper, 2 Fire Places, 1 Block in each corner, and 1 {{E|Wooden Chest|x}}. |
||
| + | | [[File:SecretRoom 38.png|250px]] |
||
| + | |} |
||
| + | |||
| + | Starting from the first floor of [[Chapter 3]] onward, {{E|Greed}} and {{E|Super Greed}} have a chance to replace Secret Rooms. |
||
| + | |||
| + | === {{dlc+|r}} Alternate Variations === |
||
| + | |||
| + | Secret Rooms in alternate chapters ({{s|Downpour}}, {{s|Dross}}, {{s|Mines}}, {{s|Ashpit}}, {{s|Mausoleum}}, {{s|Gehenna}} and {{s|Corpse}}) differ from the standard layouts. Each alternate floor has 11 unique layouts (12 in {{s|Downpour}}). Regular Secret Room layouts cannot appear on these floors. |
||
| + | {{#ev:youtube|hc32A0NgVV8}} |
||
| − | == Seeds == |
||
| + | {{dlc-}} |
||
| − | {{plat|PC}} {{mode|normal}} 927Q 481S (Secret Room above Treasure Room is not attached to any others) |
||
| − | {{plat|PC}} {{mode|hard}} 2CC7 S7YG (Secret room is attached to only one room; located on the eastern wall in the most eastern room starting from the spawn room) |
||
== Super Secret Rooms == |
== Super Secret Rooms == |
||
| − | [[file:Secret Room Door.png |
+ | [[file:Secret Room Door.png]] |
| − | Super Secret |
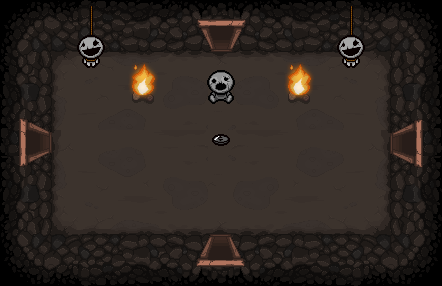
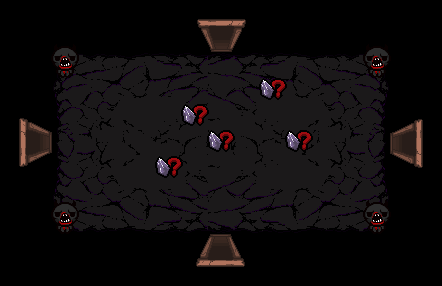
+ | {{r|Super Secret Room|no link}}s are only located next to one other room, and this room can't be a Special Room; in other words, it is placed on one of the floor's dead ends, like any other Special Room. Each Super Secret Room has set drops depending on the floor. Note that the type of Super Secret Room is not limited to certain floors it mimics (e.g. Isaac can find a {{s|Womb}}-themed Super Secret Room in {{s|Depths}}). |
| + | Super Secret Rooms are most likely to be found either at the end of a series of rooms that lead to a dead-end, and are particularly likely to appear near the {{r|Boss Room}}, as they are the second room type to be placed on a map during Map Generation, and are therefore placed far away from the room Isaac starts in. Because Shops are the third type of room generated, super secret rooms are also likely to spawn near the shop, and are likely to spawn in between the shop and the Boss Room. |
||
| − | === Possible Spawns === |
||
| + | |||
| − | {| class="wikitable mw-collapsible mw-collapsed" style="text-align: center" |
||
| + | === Possible Layouts === |
||
| − | ![[ID]] |
||
| + | {| class="wikitable mw-collapsible mw-collapsed sortable striped" style="text-align: center" |
||
| − | ! Floor layout |
||
| − | ! |
+ | ! ID |
| + | ! Weight |
||
| − | ! Image preview |
||
| + | ! class="unsortable" | Room theme |
||
| + | ! class="unsortable" | Contents |
||
| + | ! class="unsortable" | Image preview |
||
|- |
|- |
||
| 0 |
| 0 |
||
| + | | 1 |
||
| − | | {{s|The Womb}} |
||
| + | | {{s|Womb}} |
||
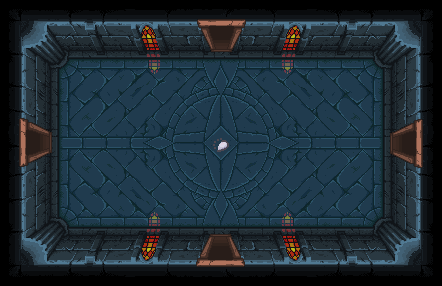
| − | | style="text-align: left" | 8 [[Red Heart]]s. Only red hearts can spawn in this room, regardless of any items. If you let {{i|Dark Bum}} collect the hearts, he will drop red hearts instead of soul hearts. Allow him to pick up the hearts and leave the room quickly, where he will drop the soul hearts or black hearts outside. |
||
| + | | style="text-align: left" | 8 random {{E|Red Heart}}s. Only Red Hearts can be created in this room, regardless of what item is used to create said Hearts (e.g. {{p|V - The Hierophant}} will create 2 Red Hearts rather than Soul Hearts). |
||
| − | | [[file:secretheart.png|250px]] |
||
| + | | [[file:SuperSecretRoom_0.png|250px]] |
||
|- |
|- |
||
| + | | 1 |
||
| 1 |
| 1 |
||
| {{s|Cathedral}} |
| {{s|Cathedral}} |
||
| − | | style="text-align: left" | |
+ | | style="text-align: left" | 1 {{E|Eternal Heart}}. Only Eternal Hearts can be created in this room, regardless of what item is used to create said Hearts (e.g. {{p|V - The Hierophant}} will drop 2 Eternal Hearts rather than Soul Hearts). |
| − | | [[file: |
+ | | [[file:SuperSecretRoom_1.png|250px]] |
|- |
|- |
||
| 2 |
| 2 |
||
| + | | 1 |
||
| {{s|Sheol}} |
| {{s|Sheol}} |
||
| − | | style="text-align: left" | |
+ | | style="text-align: left" | 1 {{E|Red Chest}}. |
| − | | [[file: |
+ | | [[file:SuperSecretRoom_2.png|250px]] |
|- |
|- |
||
| 3 |
| 3 |
||
| + | | 1 |
||
| {{s|Necropolis}} |
| {{s|Necropolis}} |
||
| − | | style="text-align: left" | |
+ | | style="text-align: left" | 1 {{m|Fortune Telling Machine}}. |
| − | | [[file: |
+ | | [[file:SuperSecretRoom_3.png|250px]] |
|- |
|- |
||
| 4 |
| 4 |
||
| + | | 1 |
||
| − | | {{s|The Cellar}} |
||
| + | | {{s|Cellar}} |
||
| − | | style="text-align: left" | Random [[trinket]]. |
||
| + | | style="text-align: left" | 1 random [[trinket]]. |
||
| − | | [[file:secrettricket.png|250px]] |
||
| + | | [[file:SuperSecretRoom_4.png|250px]] |
||
|- |
|- |
||
| 5 |
| 5 |
||
| + | | 1 |
||
| − | | {{s|The Basement}} |
||
| + | | {{s|Basement}} |
||
| − | | style="text-align: left" | 5 [[pill]]s. |
||
| + | | style="text-align: left" | 5 random [[Pill]]s. |
||
| − | | [[file:secretpills.png|250px]] |
||
| + | | [[file:SuperSecretRoom_5.png|250px]] |
||
|- |
|- |
||
| − | | 6 |
+ | | rowspan="2" | 6 |
| − | | {{dlc| |
+ | | {{dlc|na}} 1 |
| + | | {{dlc|na}} {{s|Dark Room}} |
||
| − | | style="text-align: left" | [[Black Heart]]. Only black hearts can spawn in this room, regardless of items used. This applies to {{p|VI - The Lovers}}, {{p|V - The Hierophant}} and similar items. |
||
| + | | rowspan="2" style="text-align: left" | 1 {{E|Black Heart}}. Only Black Hearts can be created in this room, regardless of what item is used to create said Hearts (e.g. {{p|V - The Hierophant}} will drop 2 Black Hearts rather than Soul Hearts). |
||
| − | | [[file:SecretLibrary.png|250px]] |
||
| + | | [[file:SuperSecretRoom 7 Rebirth.png|250px]] |
||
|- |
|- |
||
| − | | |
+ | | {{dlc|a}} 0.5 |
| − | | |
+ | | {{dlc|a}} {{r|Library}} |
| + | | [[file:SuperSecretRoom_6.png|250px]] |
||
| − | | style="text-align: left" | {{dlc|na}} [[Black Heart]]. |
||
| − | | [[file:blackheartroom.png|250px]] |
||
|- |
|- |
||
| + | | 7 {{dlc|a}} |
||
| − | | style="text-align: left" | {{dlc|a}} 4 [[Null]]s and 5 [[pill]]s or [[rune]]s. |
||
| + | | {{dlc|na+}}<br>1<br>{{dlc|a+nr}}<br>0.25<br>{{dlc|r}}<br>0.1 |
||
| − | | [[file:SecretDarkRoom.png|250px]] |
||
| + | | {{s|Dark Room}} |
||
| + | | style="text-align: left" | 1 {{E|Nulls}} in each corner, and 5 random [[Rune]]s. |
||
| + | | [[file:SuperSecretRoom_7 Afterbirth.png|250px]] |
||
|- |
|- |
||
| − | | 8 |
+ | | 8 {{dlc|a}} |
| + | | {{dlc|nr}}<br>1<br>{{dlc|r}}<br>0.5 |
||
| {{s|Burning Basement}} |
| {{s|Burning Basement}} |
||
| − | | style="text-align: left" | |
+ | | style="text-align: left" | 1 {{E|Shopkeeper}}, 2 {{E|Bomb Chest}}s, 3 {{E|TNT}}, 13 {{E|Fire Place}}s, and 5 {{E|Red Fire Place}}s.<br>{{dlc|r}} All Fire Places in the room will be extinguished if this room appears in {{s|Downpour}} or {{s|Dross}}. |
| − | | [[file: |
+ | | [[file:SuperSecretRoom_8.png|250px]] |
|- |
|- |
||
| − | | 9 |
+ | | 9 {{dlc|a}} |
| + | | {{dlc|nr}}<br>1<br>{{dlc|r}}<br>0.1 |
||
| {{s|Flooded Caves}} |
| {{s|Flooded Caves}} |
||
| − | | style="text-align: left" | |
+ | | style="text-align: left" | 1 {{E|Black Poop|x}} surrounded by 6 retracting [[Spikes]]. |
| − | | [[file: |
+ | | [[file:SuperSecretRoom_9.png|250px]] |
|- |
|- |
||
| − | | 10 |
+ | | 10 {{dlc|a}} |
| + | | {{dlc|na+}}<br>1<br>{{dlc|a+nr}}<br>0.25<br>{{dlc|r}}<br>0.5 |
||
| − | | {{dlc|a}} [[I AM ERROR]] |
||
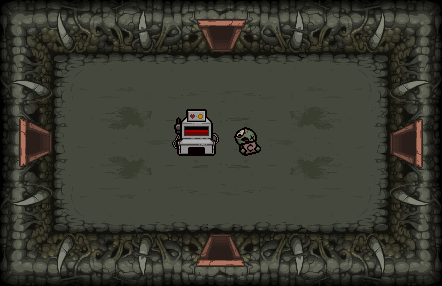
| + | | {{r|I AM ERROR}} room |
||
| − | | style="text-align: left" | Can include any of the following: [[Mom's Hand]], [[Rag Man]], random pickups, [[chest]]s, [[card]]s, [[trinket]]s, [[pill]]s and [[item]]s. |
||
| + | | style="text-align: left" | Can contain any of the following: {{E|Mom's Hand}}, {{E|Rag Man|x}}, random pickups, {{E|Chest}}s, [[Card]]s, [[trinket]]s, [[Pill]]s, and/or [[item]]s. |
||
| − | | [[file:Unknown Room.png|250px]] |
||
| + | | [[file:SuperSecretRoom_10.png|250px]] |
||
|- |
|- |
||
| − | | 11 |
+ | | 11 {{dlc|a+}} |
| + | | 1 |
||
| − | | {{dlc|a}} {{s|The Womb}} |
||
| + | | {{s|Womb}} |
||
| − | | style="text-align: left" | 4 [[red poop]]s and 3 [[Double Heart]]s. |
||
| + | | style="text-align: left" | 4 {{E|Red Poop}}s, and 3 {{E|Double Heart}}s. |
||
| − | | [[file:SecretOnePlusOneFree.png|250px]] |
||
| + | | [[file:SuperSecretRoom_11.png|250px]] |
||
|- |
|- |
||
| − | | 12 |
+ | | 12 {{dlc|a+}} |
| + | | 0.1 |
||
| − | | {{dlc|a+}} {{s|Cathedral}} |
||
| + | | {{s|Cathedral}} |
||
| − | | style="text-align: left" | 3 [[Soul Heart]]s, 2 [[Blue Fire Place]]s and an [[angel]] Statue in the center which will drop its key piece upon death. |
||
| + | | style="text-align: left" | 3 {{E|Soul Heart}}s, 2 {{E|Blue Fire Place}}s, and an [[Angel]] Statue which will summon an Angel if blown up, who will then drop a Key Piece upon death. |
||
| − | | [[file:SecretAngel.png|250px]] |
||
| + | | [[file:SuperSecretRoom_12.png|250px]] |
||
|- |
|- |
||
| − | | 13 |
+ | | 13 {{dlc|a+}} |
| + | | 0.1 |
||
| {{s|Sheol}} |
| {{s|Sheol}} |
||
| − | | style="text-align: left" | 3 |
+ | | style="text-align: left" | 3 {{E|Black Heart}}s, and 2 {{E|Black Globin's Head|x}}s. |
| − | | [[file: |
+ | | [[file:SuperSecretRoom_13.png|250px]] |
|- |
|- |
||
| − | | 14 |
+ | | 14 {{dlc|a+}} |
| − | | |
+ | | 1 |
| + | | {{r|Shop}} |
||
| − | | style="text-align: left" | A [[Beggar]] and a [[Blood Donation Machine]]. |
||
| + | | style="text-align: left" | 1 {{m|Beggar}}, and 1 {{m|Blood Donation Machine}}. |
||
| − | | [[file:SecretShop.png|250px]] |
||
| + | | [[file:SuperSecretRoom_14.png|250px]] |
||
|- |
|- |
||
| + | | rowspan="2" | 15 {{dlc|a+}} |
||
| − | | 15 |
||
| − | | |
+ | | rowspan="2" | 0.1 |
| + | | {{dlc|nr}} {{s|Womb}} |
||
| − | | style="text-align: left" | A [[red poop]], 3 [[Black Fly|Black Flies]] and a random amount of [[Red Heart]]s and [[Half Red Heart]]s. It can also contain a random amount of any other heart types, except [[Double Heart]]s. |
||
| + | | rowspan="2" style="text-align: left" | 1 Red Poop surrounded by 3 {{E|Fly|display=Flies}}, and a random number of various types {{E|Red Heart}}s, except {{E|Double Heart}}s. |
||
| − | | [[file:SecretWombNew.png|250px]] |
||
| + | | [[file:SuperSecretRoom_15.png|250px]] |
||
|- |
|- |
||
| + | | {{dlc|r}} {{s|Scarred Womb}} |
||
| − | | 16 |
||
| + | | [[file:SuperSecretRoom_15_Repentance.png|250px]] |
||
| − | | {{dlc|a+}} {{s|Cathedral}} |
||
| − | | style="text-align: left" | A [[rainbow poop]], 3 [[Black Fly|Black Flies]] and 2 [[Eternal Heart]]s. |
||
| − | | [[file:SecretRainbow.png|250px]] |
||
|- |
|- |
||
| + | | 16 {{dlc|a+}} |
||
| − | | 17 |
||
| + | | 0.1 |
||
| − | | {{dlc|a+}} {{s|Sheol}} |
||
| + | | {{s|Cathedral}} |
||
| − | | style="text-align: left" | A [[black poop]], 3 [[Black Fly|Black Flies]] and 6 [[Red Chest]]s. |
||
| + | | style="text-align: left" | 1 {{E|Rainbow Poop}} surrounded by 3 {{E|Fly|display=Flies}}, and 2 {{E|Eternal Heart}}s. |
||
| − | | [[file:SecretSheolNew.png|250px]] |
||
| + | | [[file:SuperSecretRoom_16.png|250px]] |
||
|- |
|- |
||
| + | | 17 {{dlc|a+}} |
||
| − | | 18 |
||
| + | | 0.1 |
||
| − | | {{dlc|a+}} [[Shop]] |
||
| + | | {{s|Sheol}} |
||
| − | | style="text-align: left" | 3 [[Slot Machine]]s and 2 [[Fortune Telling Machine]]s. |
||
| + | | style="text-align: left" | 1 {{E|black poop}} surrounded by 3 {{E|Fly|display=Flies}}, and 6 {{E|Red Chest}}s. |
||
| − | | [[file:SecretShopMachines.png|250px]] |
||
| + | | [[file:SuperSecretRoom_17.png|250px]] |
||
|- |
|- |
||
| + | | 18 {{dlc|a+}} |
||
| − | | 19 |
||
| + | | 0.1 |
||
| − | | {{dlc|a+}} {{s|The Basement}} |
||
| + | | {{r|Shop}} |
||
| − | | style="text-align: left" | A [[red poop]], 9 [[pill]]s and 3 [[Black Fly|Black Flies]]. |
||
| + | | style="text-align: left" | 2 {{m|Fortune Telling Machine}}s and 3 {{m|Slot Machine}}s. |
||
| − | | [[file:SecretBasementNew.png|250px]] |
||
| + | | [[file:SuperSecretRoom_18.png|250px]] |
||
| + | |- |
||
| + | | 19 {{dlc|a+}} |
||
| + | | 0.1 |
||
| + | | {{s|Basement}} |
||
| + | | style="text-align: left" | 1 {{E|Red Poop}} surrounded by 3 {{E|Fly|display=Flies}}, and 9 random [[Pill]]s. |
||
| + | | [[file:SuperSecretRoom_19.png|250px]] |
||
| + | |- |
||
| + | | 20 {{dlc|r}} |
||
| + | | 0.5 |
||
| + | | {{r|Library}} |
||
| + | | style="text-align: left" | 1 {{m|Battery Bum|d}}, 4 [[Urn]]s, 2 Cobwebs, and 3 random [[Coin]]s. |
||
| + | | [[file:SuperSecretRoom_20.png|250px]] |
||
| + | |- |
||
| + | | 21 {{dlc|r}} |
||
| + | | 0.5 |
||
| + | | {{s|Burning Basement}} |
||
| + | | style="text-align: left" | 1 {{m|Bomb Bum|d}}, 3 Rocks and 3 Fire Places in each corner, and 4 random {{E|Bomb}} pickups. |
||
| + | | [[file:SuperSecretRoom_21.png|250px]] |
||
| + | |- |
||
| + | | 22 {{dlc|r}} |
||
| + | | 0.25 |
||
| + | | {{s|Basement}} |
||
| + | | style="text-align: left" | 1 {{E|Shopkeeper}}, and 4 {{E|Greed Gaper|x}}s. |
||
| + | | [[file:SuperSecretRoom_22.png|250px]] |
||
| + | |- |
||
| + | | 23 {{dlc|r}} |
||
| + | | 0.5 |
||
| + | | {{s|Corpse}} |
||
| + | | style="text-align: left" | 1 [[Spiked Rock]] in each corner, and 3 {{E|Rotten Heart|x}}s. |
||
| + | | [[file:SuperSecretRoom_23.png|250px]] |
||
| + | |- |
||
| + | | 24 {{dlc|r}} |
||
| + | | 0.5 |
||
| + | | {{r|Arcade}} |
||
| + | | style="text-align: left" | 5 {{E|Micro Battery|x|display=Micro Batteries}}. The middle one has a 50% chance to be a {{E|Lil' Battery}}. |
||
| + | | [[file:SuperSecretRoom_24.png|250px]] |
||
| + | |- |
||
| + | | 25 {{dlc|r}} |
||
| + | | 0.25 |
||
| + | | {{s|Dank Depths}} |
||
| + | | style="text-align: left" | 1 pickup which has an 83% chance to be a {{E|Golden Key}} and a 17% chance to be a {{E|Golden Bomb|x}}, surrounded diagonally by 4 [[Skull]]s. |
||
| + | | [[file:SuperSecretRoom_25.png|250px]] |
||
| + | |- |
||
| + | | 26 {{dlc|r}} |
||
| + | | 0.01 |
||
| + | | {{s|Ashpit}} |
||
| + | | style="text-align: left" | 8 Urns, and 1 lit {{E|Giga Bomb|x}} that explodes shortly after. |
||
| + | | [[file:SuperSecretRoom_26.png|250px]] |
||
| + | |- |
||
| + | | 27 {{dlc|r}} |
||
| + | | 1 |
||
| + | | {{s|Corpse}} |
||
| + | | style="text-align: left" | 1 {{m|Rotten Beggar|d}}, and 1 {{m|Blood Donation Machine}}. |
||
| + | | [[file:SuperSecretRoom_27.png|250px]] |
||
| + | |- |
||
| + | | 28 {{dlc|r}} |
||
| + | | 0.5 |
||
| + | | {{s|Mausoleum}} |
||
| + | | style="text-align: left" | 3 Urns in each corner, and 2 {{E|Black Sack|x}}s. |
||
| + | | [[file:SuperSecretRoom_28.png|250px]] |
||
| + | |- |
||
| + | | 29 {{dlc|r}} |
||
| + | | 0.25 |
||
| + | | {{s|Gehenna}} |
||
| + | | style="text-align: left" | 4 Spikes, and 1 {{E|Golden Battery|x}}. |
||
| + | | [[file:SuperSecretRoom_29.png|250px]] |
||
| + | |- |
||
| + | | 30 {{dlc|r}} |
||
| + | | 0.25 |
||
| + | | {{s|Chest}} |
||
| + | | style="text-align: left" | 1 {{E|Mega Chest|x}}, and 2 random {{E|Key}} pickups. |
||
| + | | [[file:SuperSecretRoom_30.png|250px]] |
||
| + | |- |
||
| + | | 31 {{dlc|r}} |
||
| + | | 0.5 |
||
| + | | {{s|Cellar}} |
||
| + | | style="text-align: left" | 4 Rocks, and 2 {{E|Wooden Chest|x}}s. |
||
| + | | [[file:SuperSecretRoom_31.png|250px]] |
||
| + | |- |
||
| + | | 32 {{dlc|r}} |
||
| + | | 1 |
||
| + | | {{s|Cathedral}} |
||
| + | | style="text-align: left" | 1 {{m|Confessional|d}}. |
||
| + | | [[file:SuperSecretRoom_32.png|250px]] |
||
|} |
|} |
||
| − | === {{dlc |
+ | === {{dlc|a}} Greed Mode Layouts === |
| − | + | [[Greed Mode]] has its own set of Super Secret Room layouts. |
|
| − | {| class="wikitable mw-collapsible mw-collapsed" style="text-align: center" |
+ | {| class="wikitable mw-collapsible mw-collapsed sortable striped" style="text-align: center" |
! ID |
! ID |
||
| + | ! Weight |
||
| − | ! Floor layout |
||
| + | ! class="unsortable" | Room theme |
||
| − | ! Contents |
||
| + | ! class="unsortable" | Contents |
||
| − | ! Image preview |
||
| + | ! class="unsortable" | Image preview |
||
|- |
|- |
||
| 0 |
| 0 |
||
| + | | 1 |
||
| − | | {{s|The Womb}} |
||
| + | | {{s|Womb}} |
||
| − | | style="text-align: left" | 5 [[Red Heart]]s; only Red Hearts can spawn in this room, regardless of items used. |
||
| + | | style="text-align: left" | 5 {{E|Red Heart}}s. Only Red Hearts can be created in this room, regardless of what item is used to create said Hearts (e.g. {{p|V - The Hierophant}} will create 2 Red Hearts rather than Soul Hearts). |
||
| [[file:SuperSecret Greed0.png|250px]] |
| [[file:SuperSecret Greed0.png|250px]] |
||
|- |
|- |
||
| 1 |
| 1 |
||
| − | | |
+ | | 1 |
| + | | {{r|Arcade}} |
||
| − | | style="text-align: left" | 5 [[Penny|Pennies]]. |
||
| + | | style="text-align: left" | 5 {{E|Penny|display=Pennies}}. {{dlc|r}} One of which can be any type of [[Coin]]. |
||
| [[file:SuperSecret Greed1.png|250px]] |
| [[file:SuperSecret Greed1.png|250px]] |
||
|- |
|- |
||
| 2 |
| 2 |
||
| + | | 1 |
||
| − | | {{s|The Caves}} |
||
| + | | {{s|Catacombs}} |
||
| − | | style="text-align: left" | 3 [[Key]]s. |
||
| + | | style="text-align: left" | 3 {{E|Key}}s. |
||
| [[file:SuperSecret Greed2.png|250px]] |
| [[file:SuperSecret Greed2.png|250px]] |
||
|- |
|- |
||
| 3 |
| 3 |
||
| + | | 1 |
||
| {{s|Burning Basement}} |
| {{s|Burning Basement}} |
||
| − | | style="text-align: left" | 3 |
+ | | style="text-align: left" | 3 {{E|Bomb}}s. |
| [[file:SuperSecret Greed3.png|250px]] |
| [[file:SuperSecret Greed3.png|250px]] |
||
|- |
|- |
||
| 4 |
| 4 |
||
| + | | 1 |
||
| {{s|Cathedral}} |
| {{s|Cathedral}} |
||
| + | | style="text-align: left" | 2 {{E|Soul Heart}}s. Only Soul Hearts can be created in this room, regardless of what item is used to create said Hearts (e.g. {{p|VI - The Lovers}} will create 2 Soul Hearts rather than Red Hearts). |
||
| − | | style="text-align: left" | 2 [[Soul Heart]]s. |
||
| [[file:SuperSecret Greed4.png|250px]] |
| [[file:SuperSecret Greed4.png|250px]] |
||
|- |
|- |
||
| 5 |
| 5 |
||
| + | | 1 |
||
| [[Library]] |
| [[Library]] |
||
| + | | style="text-align: left" | 1 {{E|Black Heart}}. Only Black Hearts can be created in this room, regardless of what item is used to create said Hearts (e.g. {{p|V - The Hierophant}} will create 2 Black Hearts rather than Soul Hearts). |
||
| − | | style="text-align: left" | A [[Black Heart]]. |
||
| [[file:SuperSecret Greed5.png|250px]] |
| [[file:SuperSecret Greed5.png|250px]] |
||
|- |
|- |
||
| 6 |
| 6 |
||
| + | | 1 |
||
| − | | {{s|The Chest}} |
||
| + | | {{s|Chest}} |
||
| − | | style="text-align: left" | A [[Chest]]; small chance to spawn another type of chest instead. |
||
| + | | style="text-align: left" | 1 {{E|Chest}}; small chance to spawn another type of Chest instead. |
||
| [[file:SuperSecret Greed6.png|250px]] |
| [[file:SuperSecret Greed6.png|250px]] |
||
|- |
|- |
||
| 7 |
| 7 |
||
| + | | 1 |
||
| − | | {{s|The Chest}} |
||
| + | | {{s|Chest}} |
||
| − | | style="text-align: left" | A [[Bomb Chest]]. |
||
| + | | style="text-align: left" | 1 {{E|Bomb Chest}}. |
||
| [[file:SuperSecret Greed7.png|250px]] |
| [[file:SuperSecret Greed7.png|250px]] |
||
|- |
|- |
||
| − | | 8 |
+ | | rowspan="2" | 8 |
| + | | rowspan="2" | 1 |
||
| − | | {{s|Sheol}} |
||
| + | | rowspan="2" | {{s|Sheol}} |
||
| − | | style="text-align: left" | A [[Red Chest]]. |
||
| + | | style="text-align: left" | {{dlc|nr}} 1 {{E|Red Chest}}. |
||
| − | | [[file:SuperSecret Greed8.png|250px]] |
||
| + | | [[file:SuperSecret Greed8 Afterbirth.png|250px]] |
||
| + | |- |
||
| + | | style="text-align: left" | {{dlc|r}} 2 Red Chests. |
||
| + | | [[file:SuperSecret Greed8 Repentance.png|250px|link=Special:FilePath/SuperSecret_Greed8_Repentance.png]] |
||
|- |
|- |
||
| 9 |
| 9 |
||
| + | | 1 |
||
| − | | {{s|The Basement}} |
||
| + | | {{s|Basement}} |
||
| − | | style="text-align: left" | 4 [[pill]]s. |
||
| + | | style="text-align: left" | 4 random [[Pill]]s. |
||
| [[file:SuperSecret Greed9.png|250px]] |
| [[file:SuperSecret Greed9.png|250px]] |
||
|- |
|- |
||
| 10 |
| 10 |
||
| − | | |
+ | | 1 |
| + | | {{r|Library}} |
||
| − | | style="text-align: left" | 2 [[card]]s. |
||
| + | | style="text-align: left" | 2 random [[Card]]s. |
||
| [[file:SuperSecret Greed10.png|250px]] |
| [[file:SuperSecret Greed10.png|250px]] |
||
|- |
|- |
||
| 11 |
| 11 |
||
| + | | 1 |
||
| − | | {{s|The Cellar}} |
||
| + | | {{s|Cellar}} |
||
| − | | style="text-align: left" | 4 [[Lil' Battery|Lil' Batteries]]. |
||
| + | | style="text-align: left" | 4 {{E|Lil' Battery|display=Lil' Batteries}}. {{dlc|r}} Each battery has a 50% chance to be a [[Batteries|Random Battery]] instead. |
||
| [[file:SuperSecret Greed11.png|250px]] |
| [[file:SuperSecret Greed11.png|250px]] |
||
|- |
|- |
||
| 12 |
| 12 |
||
| + | | 1 |
||
| {{s|Dark Room}} |
| {{s|Dark Room}} |
||
| − | | style="text-align: left" | 2 [[ |
+ | | style="text-align: left" | 2 random [[Rune]]s. |
| [[file:SuperSecret Greed12.png|250px]] |
| [[file:SuperSecret Greed12.png|250px]] |
||
|- |
|- |
||
| − | | 13 |
+ | | rowspan="2" | 13 |
| − | | |
+ | | 1 |
| + | | rowspan="2" | {{s|Sheol}} |
||
| − | | style="text-align: left" | 2 [[Red Chest]]s. |
||
| + | | style="text-align: left" | {{dlc|nr}} 2 {{E|Red Chest}}s. |
||
| − | | [[file:SuperSecret Greed13.png|250px]] |
||
| + | | [[file:SuperSecret Greed8 Repentance.png|250px]] |
||
| + | |- |
||
| + | | 0.5 |
||
| + | | style="text-align: left" | {{dlc|r}} 3 Red Chests. |
||
| + | | [[file:SuperSecret Greed13 Repentance.png|250px|link=Special:FilePath/SuperSecret_Greed13_Repentance.png]] |
||
|- |
|- |
||
| 14 |
| 14 |
||
| + | | 1 |
||
| − | | {{s|The Cellar}} |
||
| + | | {{s|Cellar}} |
||
| − | | style="text-align: left" | 2 [[trinket]]s. |
||
| + | | style="text-align: left" | 2 random [[trinket]]s. |
||
| [[file:SuperSecret Greed14.png|250px]] |
| [[file:SuperSecret Greed14.png|250px]] |
||
|- |
|- |
||
| 15 |
| 15 |
||
| + | | {{dlc|nr}}<br>1.0<br>{{dlc|r}}<br>0.5 |
||
| − | | {{s|The Cellar}} |
||
| + | | {{s|Cellar}} |
||
| − | | style="text-align: left" | A [[trinket]]. |
||
| + | | style="text-align: left" | 1 random [[trinket]]. |
||
| [[file:SuperSecret Greed15.png|250px]] |
| [[file:SuperSecret Greed15.png|250px]] |
||
|- |
|- |
||
| 16 |
| 16 |
||
| − | | |
+ | | 1 |
| + | | {{r|Clean Bedroom}} |
||
| − | | style="text-align: left" | A [[bed]]. |
||
| + | | style="text-align: left" | 1 [[bed]]. |
||
| [[file:SuperSecret Greed16.png|250px]] |
| [[file:SuperSecret Greed16.png|250px]] |
||
|- |
|- |
||
| 17 |
| 17 |
||
| + | | 1 |
||
| − | | [[I AM ERROR]] |
||
| + | | {{r|I AM ERROR}} room |
||
| − | | style="text-align: left" | A trapdoor to the next floor. |
||
| + | | style="text-align: left" | 1 trapdoor to the next floor. |
||
| [[file:SuperSecret Greed17.png|250px]] |
| [[file:SuperSecret Greed17.png|250px]] |
||
|- |
|- |
||
| 18 |
| 18 |
||
| + | | {{dlc|nr}}<br>1<br>{{dlc|r}}<br>0.5 |
||
| − | | {{s|The Basement}} |
||
| + | | {{s|Basement}} |
||
| − | | style="text-align: left" | 17 piles of [[poop]]. |
||
| + | | style="text-align: left" | 17 {{E|Poop}}s. |
||
| [[file:SuperSecret Greed18.png|250px]] |
| [[file:SuperSecret Greed18.png|250px]] |
||
|- |
|- |
||
| 19 |
| 19 |
||
| + | | {{dlc|nr}}<br>1<br>{{dlc|r}}<br>0.25 |
||
| {{s|The Shop}} |
| {{s|The Shop}} |
||
| − | | style="text-align: left" | |
+ | | style="text-align: left" | 1 {{E|Golden Bomb|x}}. |
| [[file:SuperSecret Greed19.png|250px]] |
| [[file:SuperSecret Greed19.png|250px]] |
||
|- |
|- |
||
| 20 |
| 20 |
||
| + | | 1 |
||
| {{s|The Shop}} |
| {{s|The Shop}} |
||
| − | | style="text-align: left" | |
+ | | style="text-align: left" | 1 {{E|Golden Poop}}. |
| [[file:SuperSecret Greed20.png|250px]] |
| [[file:SuperSecret Greed20.png|250px]] |
||
|- |
|- |
||
| 21 |
| 21 |
||
| + | | {{dlc|nr}}<br>1<br>{{dlc|r}}<br>0.25 |
||
| {{s|The Shop}} |
| {{s|The Shop}} |
||
| − | | style="text-align: left" | |
+ | | style="text-align: left" | 1 {{E|Golden Key}}. |
| [[file:SuperSecret Greed21.png|250px]] |
| [[file:SuperSecret Greed21.png|250px]] |
||
|- |
|- |
||
| 22 |
| 22 |
||
| + | | 1 |
||
| − | | {{s|The Catacombs}} |
||
| + | | {{r|Secret Room}} |
||
| − | | style="text-align: left" | A random item from the [[Treasure Room (Greed Mode Item Pool)|Greed mode Treasure Room pool]]. |
||
| + | | style="text-align: left" | {{dlc|nr}} 1 [[Treasure Room (Greed Mode Item Pool)|Greed Mode Treasure Room item]].<br>{{dlc|r}} 1 [[Secret Room (Greed Mode Item Pool)|Greed Mode Secret Room item]]. |
||
| [[file:SuperSecret Greed22.png|250px]] |
| [[file:SuperSecret Greed22.png|250px]] |
||
|- |
|- |
||
| 23 |
| 23 |
||
| + | | 1 |
||
| − | | {{s|The Chest}} |
||
| + | | {{s|Chest}} |
||
| − | | style="text-align: left" | 2 [[Locked Chest]]s. |
||
| + | | style="text-align: left" | 2 {{E|Locked Chest}}s. |
||
| [[file:SuperSecret Greed23.png|250px]] |
| [[file:SuperSecret Greed23.png|250px]] |
||
|- |
|- |
||
| 24 |
| 24 |
||
| + | | 1 |
||
| {{s|Cathedral}} |
| {{s|Cathedral}} |
||
| + | | style="text-align: left" | 1 {{E|Eternal Heart}}. Only Eternal Hearts can be created in this room, regardless of what item is used to create said Hearts (e.g. {{p|V - The Hierophant}} will create 2 Eternal Hearts rather than Soul Hearts). |
||
| − | | style="text-align: left" | 1 [[Eternal Heart]]. |
||
| [[file:SuperSecret Greed24.png|250px]] |
| [[file:SuperSecret Greed24.png|250px]] |
||
|- |
|- |
||
| 25 |
| 25 |
||
| + | | {{dlc|nr}}<br>1<br>{{dlc|r}}<br>0.1 |
||
| − | | {{s|The Womb}} |
||
| + | | {{s|Womb}} |
||
| − | | style="text-align: left" | 1 [[Half Red Heart]]. |
||
| + | | style="text-align: left" | 1 {{E|Half Red Heart}}. Only Half Red Hearts can be created in this room, regardless of what item is used to create said Hearts (e.g. {{p|V - The Hierophant}} will create 2 Half Red Hearts rather than Soul Hearts). |
||
| [[file:SuperSecret Greed25.png|250px]] |
| [[file:SuperSecret Greed25.png|250px]] |
||
| + | |- |
||
| − | |} {{dlc||r}} |
||
| + | | 26 {{dlc|r}} |
||
| + | | 0.1 |
||
| + | | {{r|Arcade}} |
||
| + | | style="text-align: left" | 1 {{E|Golden Penny|x}}. |
||
| + | | [[file:SuperSecret Greed26.png|250px]] |
||
| + | |- |
||
| + | | 27 {{dlc|r}} |
||
| + | | 0.5 |
||
| + | | {{s|Necropolis}} |
||
| + | | style="text-align: left" | 1 [[Secret Room (Greed Mode Item Pool)|Greed Mode Secret Room item]] surrounded by pits and 2 spike rocks that can fill up pits when destroyed from a certain direction. |
||
| + | | [[File:SuperSecret Greed27.png|250px|link=Special:FilePath/SuperSecret_Greed27.png]] |
||
| + | |} |
||
| + | |||
| + | == {{dlc+|r}} Ultra Secret Rooms == |
||
| + | {{r|Ultra Secret Room|no link}}s are special rooms that are not connected to any other room on the map directly. They are not revealed by most mapping effects ({{i|The Mind}}, etc.) and can only be revealed on the map with {{i|Cracked Orb}}, {{i|Book of Secrets}}, [[Book of Virtues|wisps]], and {{p|Rune Shard}}. They can be accessed directly by opening {{r|Red Room|no link}}s adjacent to them using {{i|Red Key}} or Red Key [[Book of Virtues|wisps]], {{t|Crystal Key}}, {{p|Cracked Key}}, and {{p|Soul of Cain}}: entering a Red Room next to the Ultra Secret room will reveal its position and automatically open the doorway leading into it. It can also be entered by teleporting to it using {{p|XVIII - The Moon?}}; when teleported into, a pathway of Red Rooms back to the rest of the level will be opened automatically. Ultra Secret rooms contain items from the [[Ultra Secret Room (Item Pool)|Ultra Secret Room item pool]]. |
||
| + | |||
| + | [[File:Common USR Locations.png|alt=Common Ultra Secret Room locations|thumb|Common Ultra Secret Room locations]] |
||
| + | Ultra Secret rooms are most likely generated in spots that connect to 3+ non-red rooms through its adjacent red rooms (different squares in L rooms count as 2). They can be connected to 2 or 1 non-red rooms through its adjacent red rooms, but a specific 3+ room location is 11.5x more likely than a specific 2 room location, and 1 room locations being virtually impossible if there is a 3+ location available<!-- It seems sometimes the last dead end created cannot connect to the Ultra Secret Room, which can create a scenario where a 1 room location is chosen when a 3+ location is available -->. If there is no 3+ room location available then a specific 2 room location is 11.5x more likely than a specific 1 room location. <!-- The 11.5x figure comes from the regular Secret Room mechanics, applying them to the USR, which based on testing seems to be fairly accurate --> |
||
| + | |||
| + | Ultra Secret Rooms can't be connected to red rooms that connect to Secret Rooms, Super Secret Rooms, or {{R|Curse Room}}s, and can't be in a location where any of its adjacent red rooms are invalid, such as next to a {{r|Boss Room}} (Boss Rooms in {{s|The Void}} can have red rooms next to them, but the Ultra Secret Room will never be connected to one), next to the sides of narrow rooms, or any room that can't have a red room opened on that specific side, however locations on the 13x13 border where a red room would normally open to an {{r|I AM ERROR}} room are allowed. |
||
| + | |||
| + | === Notes === |
||
| + | * Generally, the best strategy for finding Ultra Secret Rooms is by checking a location that connects to at least 3 non-red rooms through its adjacent red rooms (in which all sides can have red rooms created, and isn't next to a Secret, Super Secret, or Curse Room), and if it's not in any 3+ locations, checking the spots connected to 2 rooms, then 1. |
||
| + | ** When choosing which side to open from, the best way to increase your odds is to open the red room that connects to the highest number of other potential Ultra Secret Room locations. |
||
| + | *** However, there is also value in choosing to open a red room that connects to an otherwise hard-to-access room, such as a {{r|Boss Challenge Room}}. |
||
| + | ** If the only remaining valid locations are connected to a single non-red room, it's just as likely for the Ultra Secret Room to be connected to the side of a single room as it is connected to a corner. |
||
| + | * {{curse|maze}} can move a room in a way that prevents creating a red room that connects to the Ultra Secret Room. |
||
| + | * The doors of the Ultra Secret Room are opened automatically only when approached from the outside. If other rooms exist adjacent to it, the doors will not open from inside the Ultra Secret Room without bombing them or returning from the outside. |
||
| + | ** Red Key or Cracked Keys must be used before the bombs, as otherwise explosions won't have an effect. |
||
| + | * The Ultra Secret Room can generate north of the Mega Satan door, despite not being able to create a red room there. |
||
| + | * In the [[Mirrored World]], the Ultra Secret Room will be empty, same as any Special Room. |
||
| + | * It's possible for the Ultra Secret Room to not generate if there are no valid locations. |
||
| + | |||
| + | === Layouts === |
||
| + | |||
| + | {| class="wikitable mw-collapsible mw-collapsed sortable striped" style="text-align: center" |
||
| + | ! ID |
||
| + | ! Weight |
||
| + | ! class="unsortable" | Contents |
||
| + | ! class="unsortable" | Image preview |
||
| + | |- |
||
| + | | 0 |
||
| + | | 1.0 |
||
| + | | style="text-align: left" | 2 {{E|Shopkeeper}}s, 4 {{E|Poop}}s behind Key Blocks, some [[Cobwebs]], 2 random {{E|Key}}s, and 1 [[Ultra Secret Room (Item Pool)|Ultra Secret Room item]]. |
||
| + | | [[file:UltraSecretRoom 0.png|250px]] |
||
| + | |- |
||
| + | | 1 |
||
| + | | 1.0 |
||
| + | | style="text-align: left" | Several Key Blocks and Metal Blocks along the walls, and 1 [[Ultra Secret Room (Item Pool)|Ultra Secret Room item]]. |
||
| + | | [[file:UltraSecretRoom 1.png|250px]] |
||
| + | |- |
||
| + | | 2 |
||
| + | | 1.0 |
||
| + | | style="text-align: left" | 2 [[Shopkeeper]]s, several Key Blocks, and 1 [[Ultra Secret Room (Item Pool)|Ultra Secret Room item]]. |
||
| + | | [[file:UltraSecretRoom 2.png|250px]] |
||
| + | |- |
||
| + | | 3 |
||
| + | | 1.0 |
||
| + | | style="text-align: left" | 1 [[Shopkeeper]] behind Key Blocks, a few Cobwebs, and 1 [[Ultra Secret Room (Item Pool)|Ultra Secret Room item]] blocked off by Key Blocks and Metal Blocks. |
||
| + | | [[file:UltraSecretRoom 3.png|250px]] |
||
| + | |- |
||
| + | | 4 |
||
| + | | 0.75 |
||
| + | | style="text-align: left" | 1 [[Shopkeeper]], a few [[Cobwebs]], and Rocks in the shape of a Key, with 1 [[Ultra Secret Room (Item Pool)|Ultra Secret Room item]] inside the Key's 'loop'. |
||
| + | | [[file:UltraSecretRoom 4.png|250px]] |
||
| + | |- |
||
| + | | 5 |
||
| + | | 0.5 |
||
| + | | style="text-align: left" | 2 [[Shopkeeper]]s, a few Cobwebs, several [[Urn]]s, 3 random [[Coins]], and 4 {{E|Greed Gaper|x}}s guarding 1 [[Ultra Secret Room (Item Pool)|Ultra Secret Room item]]. |
||
| + | | [[file:UltraSecretRoom 5.png|250px]] |
||
| + | |- |
||
| + | | 6 |
||
| + | | 0.25 |
||
| + | | style="text-align: left" | 10 [[Shopkeeper]]s, 2 {{E|Fire Place}}s, a Rock, some Cobwebs, and 2 [[Ultra Secret Room (Item Pool)|Ultra Secret Room items]]. |
||
| + | | [[file:UltraSecretRoom 6.png|250px]] |
||
| + | |- |
||
| + | | 7 |
||
| + | | 0.1 |
||
| + | | style="text-align: left" | 2 [[Shopkeeper]]s, some Cobwebs, a Rock, 10 {{E|Key}}s, and 2 {{E|Key Ring}}s. |
||
| + | | [[file:UltraSecretRoom 7.png|250px]] |
||
| + | |- |
||
| + | | 8 |
||
| + | | 1.0 |
||
| + | | style="text-align: left" | 1 [[Shopkeeper]], some Cobwebs, 1 Key Block in each corner, and an item between some Retractable Spikes. |
||
| + | | [[file:UltraSecretRoom 8.png|250px]] |
||
| + | |} |
||
| + | {{dlc-}} |
||
== Notes == |
== Notes == |
||
| − | * Secret |
+ | * Secret Rooms are found by bombing the middle of a wall in a standard size room. For larger size rooms, divide the room mentally into the size of individual rooms to figure out where to bomb. |
| + | * One easy strategy to place the bomb correctly in large rooms is to position Isaac in a corner, walk along a wall, then place the bomb at the spot where the camera starts moving. |
||
| − | * Rooms adjacent to secret rooms will always have a clear, walkable path to the middle of the wall where you can set a bomb. Secret Room entrances are never found in front of gaps, obstacles, or spikes. All the rooms next to a Secret Room must satisfy these requirements, so if one room near a suspicious gap in the map fails these requirements, then look elsewhere. |
||
| + | * For closet-size rooms, Secret Rooms will never be found by bombing the sides but may be found by bombing the wall at the end of the closet. |
||
| − | ** Cobwebs are sometimes next to Secret Room entrances. |
||
| + | * Rooms adjacent to Secret Rooms will always have a clear, walkable path to the middle of the wall where Isaac can place a bomb. Secret Room entrances are never found in front of gaps, obstacles, spikes, or places that enemies spawned when the room was originally entered. Each room adjacent to a Secret Room must satisfy these requirements, so if one room near a suspicious gap in the map fails these requirements, then look elsewhere. |
||
| − | * If there are no valid Secret Room locations surrounded by 3 or 4 rooms, it is possible for a Secret Room to be adjacent to only 1 or 2 rooms. |
||
| + | * Secret Rooms are equally as likely to be in a valid location with 3 neighbors, as it is with 4 neighbors. 2 neighbor locations are rare but possible, even when there are locations with 3+ neighbors available. 1 neighbor locations can only happen if there are no valid 3+ neighbor locations, and are very rare. <!-- This is simplified. Normal room layouts are generated after the Secret Room is placed, but other special room layouts are generated before the Secret Room is placed. This means that a wall being blocked only matters for special rooms when the room is placed, and a 1 neighbor location can occur when a 3+ neighbor location exists only when its walls are blocked by special rooms --> |
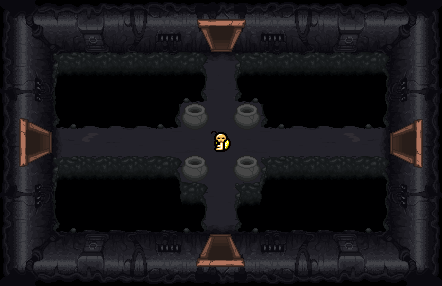
||
[[file:Secret Room 1 Adjacent.png|alt=A secret room adjacent to only one room|250px|right|thumb|A secret room adjacent to only one room]] |
[[file:Secret Room 1 Adjacent.png|alt=A secret room adjacent to only one room|250px|right|thumb|A secret room adjacent to only one room]] |
||
| − | * {{i|X-Ray Vision}} opens all available entrances to both the |
+ | * {{i|X-Ray Vision}} opens all available entrances to both the Secret Room and the Super Secret Room. The [[I Can See Forever]] pill does the same for the floor on which the pill was used. {{i|Dog Tooth}} will play a howl sound effect when Isaac enters a room adjacent to a Secret Room or Super Secret Room, and {{i|YO LISTEN!}} will hover over Secret Room entrances. |
| − | * Teleportation items can randomly teleport Isaac into Secret Rooms, and {{p|XVIII - The Moon}} |
+ | * Teleportation items can randomly teleport Isaac into Secret Rooms, and {{p|XVIII - The Moon}} will always teleport Isaac to the Secret Room. |
| − | * Secret Rooms are revealed on the map with {{i| |
+ | * Secret Rooms are revealed on the map with {{i|Blue Map}}, {{i|Book of Secrets}}, {{i|Crystal Ball}}, {{i|The Mind}}, {{i|Spelunker Hat}}, {{p|XIX - The Sun}}, or {{p|XXI - The World}}, but Isaac will still need to open their entrance. |
| − | * |
+ | * {{i|Red Key}} can be used to find Secret Rooms. The lack of Red door frame means a Secret Room could have generated on the other side. |
| + | * {{i|Star of Bethlehem}} sometimes reveals Secret Rooms as it can travel through them. |
||
| − | * If [[Greed]] or [[Super Greed]] spawn into the Secret Room, you won't be able to exit it (like a Mini-Boss room), but once the fight ends, all the exits of the Secret Room will be accessible. |
||
| + | * If {{E|Greed}} or {{E|Super Greed}} spawn inside a Secret Room, Isaac won't be able to exit it (like a {{r|Mini-Boss Room}}), but once the fight ends, all the exits of the Secret Room will be accessible. |
||
| − | * Secret Rooms can exist next to all types of rooms except [[Boss Room]]s, allowing certain restricted rooms to be entered. |
||
| + | ** An exception to this is that {{r|Challenge Room}}s and {{r|Boss Challenge Room}}s will be inaccessible; the metal bars won't be removed from walls that lead to them after the fight concludes. |
||
| − | ** Even if you have no keys, it is possible to bomb into a locked special room should there exist an adjacent Secret Room. Leaving through the door will unlock the room without requiring a key. |
||
| + | * Secret Rooms can exist next to all types of rooms except {{r|Boss Room}}s, Super Secret Rooms, and other Secret Rooms; allowing certain restricted rooms to be entered. |
||
| − | ** It is possible to enter [[Curse Room]]s without taking damage by bombing in from a secret room. |
||
| + | ** Even if Isaac has no Keys, it is possible to bomb into a locked Special Room should there exist an adjacent Secret Room. Leaving through the door will unlock the room without requiring a Key. |
||
| − | ** It is possible to access [[Challenge Room]]s even if you don't meet the health requirements, but it is not possible to "steal" the items, as the hole will be blocked up as soon as the fighting stage begins. However, items can still be stolen by using Telepills or other teleportation items. The Challenge Room will not be accessible from the Secret Room if the Secret Room contained a fight with Super Greed. Boards will remain over the entrance to the challenge room even after the fight is over. |
||
| + | ** It is possible to enter {{r|Curse Room}}s without taking damage by bombing in from a Secret Room. |
||
| − | * Super secret rooms replace the dead-end room that would require the 2nd most rooms walked through from the start room to access, and cannot be connected to the secret room. |
||
| + | ** It is possible to access {{r|Challenge Room}}s even if Isaac doesn't meet the health requirements, but it is not possible to "steal" the items, as the hole will be blocked up as soon as the fighting stage begins. |
||
| − | ** For reference, the [[Boss Room]] takes the dead-end room that would require the most rooms walked through, and the [[Shop]] takes the room that would require the 3rd most. This means that the Super Secret Room is equally as far or further from the start room than the Shop. It also means the Super Secret Room tends to be close to the Boss Room. Loops and large rooms connected to more than one room on any given side can tamper with this logic, however. |
||
| − | * |
+ | * {{dlc|r}} Secret Rooms of all types do not exist in the [[Ascent]]. |
| + | * {{dlc|r}} Once {{a|Corrupted Data|n}} is achieved (beating {{E|Delirium|x}} as {{c|Tainted Eden}}), items that spawn in Secret Rooms have a chance to be "glitched" as if affected by {{i|TMTRAINER|n}}. |
||
| + | * Super Secret Rooms replace the dead-end room that would require the 2nd most rooms walked through from the start room to access, and cannot be connected to the Secret Room. |
||
| + | ** For reference, the {{r|Boss Room}} takes the dead-end room that would require the most rooms walked through, and the {{r|Shop}} takes the room that would require the 3rd most. This means that the Super Secret Room is equally as far or further from the start room than the Shop. It also means the Super Secret Room tends to be close to the Boss Room. Loops and large rooms connected to more than one room on any given side can tamper with this logic, however. |
||
| + | ** Sometimes, the Boss Room will not be the furthest dead-end room; usually, in these cases, the Boss Room has one side blocked off and the Super Secret Room will be connected to the furthest normal room, with the wall leading to it being on the opposite side of the blocked off side in the Boss Room. |
||
| + | *** For example, if the blocked off side in the Boss Room is to the north, the Super Secret Room will be to the south of the furthest normal room. |
||
| + | * Super Secret Rooms can have layouts with themes from floors that Isaac hasn't unlocked yet. |
||
== Trivia == |
== Trivia == |
||
| − | * In the original ''Binding of Isaac'', |
+ | * In the original ''The'' ''Binding of Isaac'', Secret Rooms worked differently; if the player left a room after opening a Secret Room entrance, the entrance would disappear. To access the room again for any purpose, the player needed another {{E|bomb}} to reopen the entrance. |
| + | ** For some reason, {{r|Challenge Room}}s and {{r|Boss Challenge Room}}s still work this way. |
||
| + | * Prior to V1.7.5, Ultra Secret Rooms used the [[Angel Room (Item Pool)|Angel Room Item Pool]]. This was meant as a placeholder. |
||
== Bugs == |
== Bugs == |
||
{{bug|After defeating an Angel spawned in a Super Secret Room, the music will not return to the floor's regular music.}} |
{{bug|After defeating an Angel spawned in a Super Secret Room, the music will not return to the floor's regular music.}} |
||
| + | {{bug|After fighting Greed/Super Greed spawn inside a Secret Room, if there is an adjacent Challenge Room or Boss Challenge Room, the metal bars from the Greed/Super Greed fight will not disappear after the fight has ended, making it impossible to enter the Challenge/Boss Challenge room this way.}} |
||
| − | {{bug|Teleporting to the Super Secret Room in Greed or Greedier Mode, when the room is generated behind a still-locked Treasure Room, will trap the player inside.}} |
||
| + | {{bug|dlc=a|Teleporting to the Super Secret Room in Greed or Greedier Mode, when the room is generated behind a still-locked Treasure Room, can trap Isaac inside.}} |
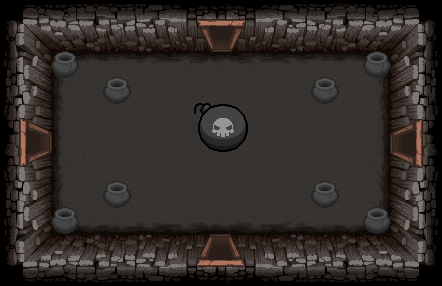
||
| + | {{bug|dlc=r|Certain secret rooms result in a crash (observed on seed {{mode|hard}} THWM 9284, Dank Depths II)}} |
||
| + | |||
| + | == References == |
||
| + | <references /> |
||
{{nav|room}} |
{{nav|room}} |
||
Latest revision as of 18:01, 2 April 2024
![]()
![]() Secret Rooms are rooms that are not normally visible on the map and are usually accessed by bombing a wall leading to them. Regular Secret Rooms are usually located next to 3 or 4 rooms, while
Secret Rooms are rooms that are not normally visible on the map and are usually accessed by bombing a wall leading to them. Regular Secret Rooms are usually located next to 3 or 4 rooms, while ![]() Super Secret Rooms can only be next to one room; they are placed on one of the dead ends generated on the map, similar to other Special Rooms. Very rarely, the regular Secret Room may also be located next to only one room. Entrances to Secret Rooms will never have rocks or gaps in the way. Secret Rooms usually contain at least one
Super Secret Rooms can only be next to one room; they are placed on one of the dead ends generated on the map, similar to other Special Rooms. Very rarely, the regular Secret Room may also be located next to only one room. Entrances to Secret Rooms will never have rocks or gaps in the way. Secret Rooms usually contain at least one ![]() Shopkeeper. Secret Rooms stay open after bombing them.
Shopkeeper. Secret Rooms stay open after bombing them.
Variations[ | ]
The following room maps were made using Basement Renovator[1] for cleaner viewing; note that all Urns you see will be Mushrooms when encountered in-game.
Possible Layouts[ | ]
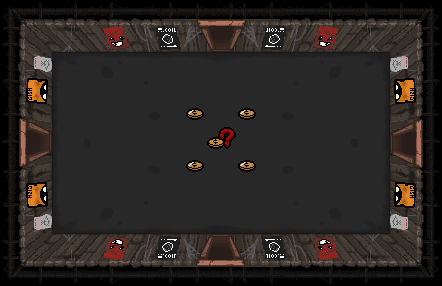
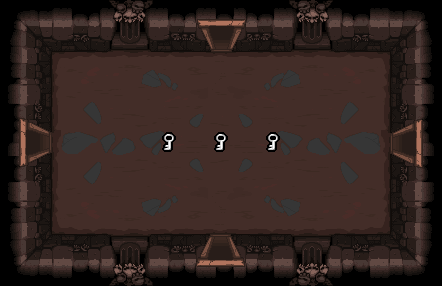
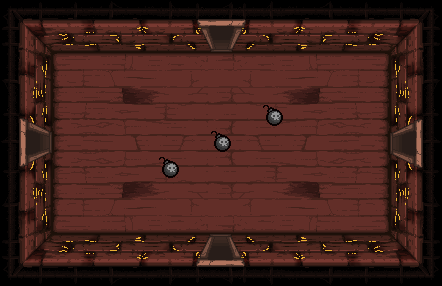
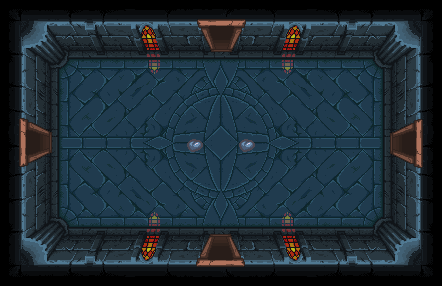
| ID | Weight | Contents | Image preview |
|---|---|---|---|
| 0 | 1.0 | 1 |

|
| 1 | 1.0 | 1 Shopkeeper, 2 Fire Places, and 3 random Coins. | 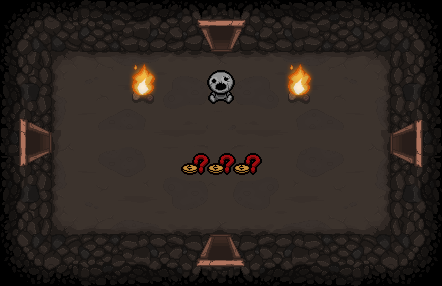
|
| 2 | 1.0 | 1 Shopkeeper, 2 Fire Places, 4 Rocks and 6 random Coins. | 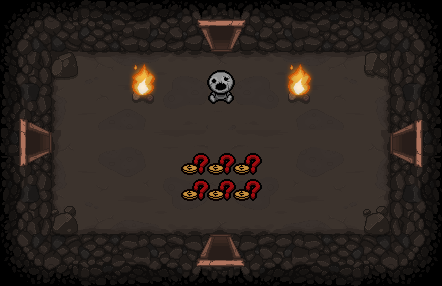
|
| 3 | 1.0 | 1 Shopkeeper, 2 Fire Places, 4 Rocks, and 9 random Coins. | 
|
| 4 | 1.0 | 1 Shopkeeper, 4 Rocks, and 1 |

|
| 5 | 1.0 | 1 Shopkeeper, 5 Mushrooms, 4 Cobwebs, and 3 random Pickups. | 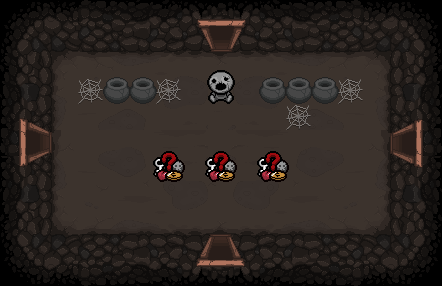
|
| 6 | 1.0 | 1 Shopkeeper, 2 |

|
| 7 | 1.0 | 1 Shopkeeper, 2 Mushrooms, and 3 random Pills. | 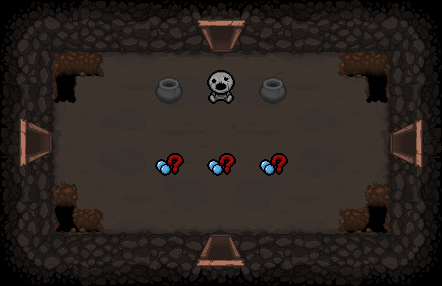
|
| 8 | 1.0 | 1 Shopkeeper surrounded by 4 Cobwebs, and 3 random Coins. | 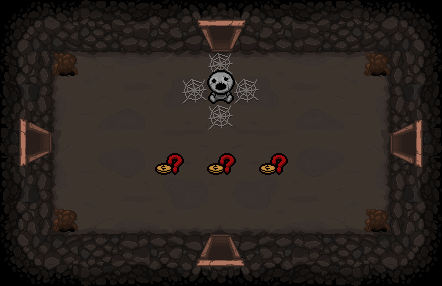
|
| 9 | 1.0 | 1 Shopkeeper, 2 Fire Places, 4 Rocks in each corner, and 3 random |
|
| 10 | 1.0 0.75 |
1 Shopkeeper, 2 Fire Places, 2 Red Fire Places, and a |
|
| 11 | 1.0 | 1 Shopkeeper, and 2 random |
|
| 12 | 1.0 | 4 Shopkeepers, 1 Red Fire Place, and 2 random Bomb pickups. | 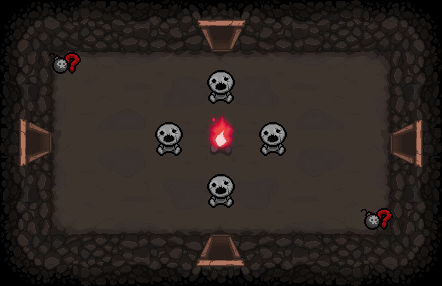
|
| 13 | 1.0 | 1 |
|
| 14 | 1.0 0.5 |
3 Shopkeepers, and 1 |
|
| 15 | 1.0 | 1 Shopkeeper, 20 Mushrooms, and 1 |
|
| 16 |
1.0 0.25 |
1 Shopkeeper, 2 Fire Places, and 1 Corny Poop. | 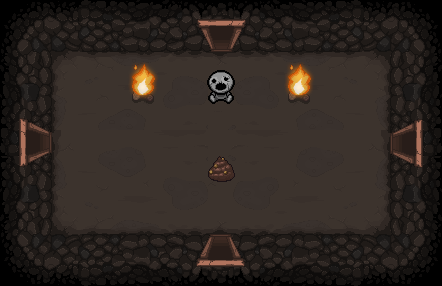
|
| 17 |
1.0 0.25 |
1 Shopkeeper, 2 Fire Places, 2 Rocks, and 2 |
|
| 18 |
1.0 | 1 Shopkeeper, 2 Fire Places, 20 Cobwebs, 4 |
|
| 19 |
1.0 0.5 |
2 Shopkeepers in the upper 2 corners, with 4 more plus a Secret Room item on the other side of several gap in the floor. There are four obstacles that have equal, independent chances of being Blocks, Fire Places, Rocks, and/or Spikes; if they are Rocks, they can be bombed to bridge the gap and allow access to the room's center. | 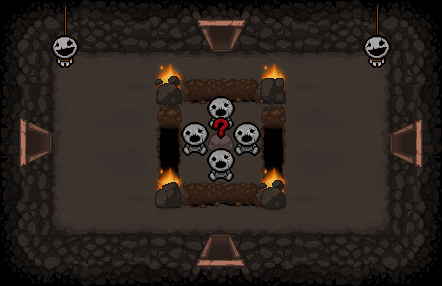
|
| 20 |
1.0 0.25 |
1 Shopkeeper, 2 Fire Places, and 1 Reward Plate. | 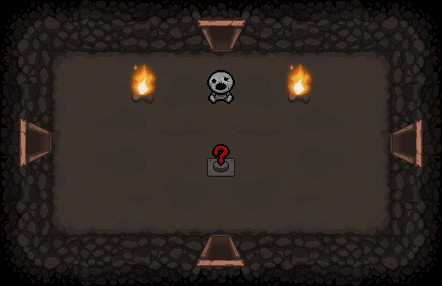
|
| 21 |
1.0 | 1 Shopkeeper, 2 Fire Places, and several Rocks and Key Blocks blocking access to 2 rewards in the upper corners. The rewards have equal, independent chances of being Chests, |
|
| 22 |
1.0 | 3 Shopkeepers, 2 Fire Places, and 1 |
|
| 23 |
1.0 0.5 |
1 Shopkeeper, 2 Fire Places, 1 Grab Bag, and 1 |

|
| 24 |
1.0 0.25 |
1 Shopkeeper, 2 Blocks, and 10 Mushrooms. | 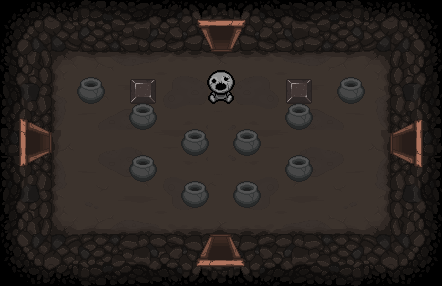
|
| 25 |
1.0 0.5 |
1 Shopkeeper, 2 Fire Places, and 2 Grab Bags. | 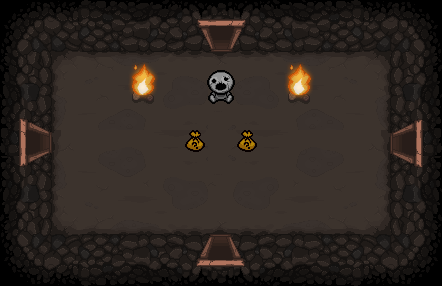
|
| 26 |
1.0 0.5 |
1 Shopkeeper, 2 Fire Places, 2 Poops, 6 Mushrooms, and 1 |

|
| 27 |
1.0 0.25 |
1 Shopkeeper, 2 Fire Places, and 2 |
|
| 28 |
0.1 | 1 Shopkeeper, 2 Fire Places, 2 |

|
| 29 |
0.1 | 5 Shopkeepers, and 1 Secret Room item behind 4 Blocks and 4 Purple Fire Places. | 
|
| 30 |
0.1 | 1 Shopkeeper, 2 Fire Places, 2 Poops, and 1 |
|
| 31 |
0.25 | 1 Shopkeeper, 4 Fire Places, 44 Rocks, and 1 |
|
| 32 |
1 | 1 Shopkeeper, 2 Poops, 10 Mushrooms, and 5 random Coins. | 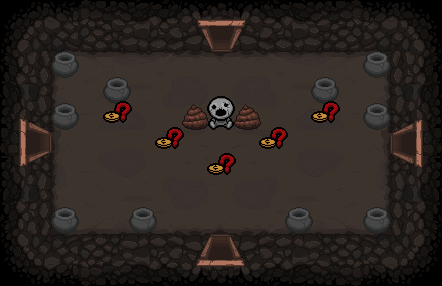
|
| 33 |
0.5 | 2 Shopkeepers, 4 Fire Places, 2 Rocks, and 3 Mushrooms and 1 rock which surround 1 random Card. | 
|
| 34 |
0.5 | 2 Shopkeepers, 2 Fire Places, 1 Spiked Rock in each corner, and 1 Secret Room item behind Blocks, Key Blocks, and Spikes. | 
|
| 35 |
1 | 1 Shopkeeper, 3 random Coins, along with 1 |
|
| 36 |
1 | 2 Shopkeepers, 1 Spiked Rock in each corner, and 1 random Chest that is surrounded by Rocks, which can be destroyed with 1 nearby |
|
| 37 |
0.5 | One |
|
| 38 |
0.5 | 1 Shopkeeper, 2 Fire Places, 1 Block in each corner, and 1 |
|
Starting from the first floor of Chapter 3 onward, ![]() Greed and
Greed and ![]() Super Greed have a chance to replace Secret Rooms.
Super Greed have a chance to replace Secret Rooms.
 Alternate Variations[ | ]
Secret Rooms in alternate chapters (![]() Downpour,
Downpour, ![]() Dross,
Dross, ![]() Mines,
Mines, ![]() Ashpit,
Ashpit, ![]() Mausoleum,
Mausoleum, ![]() Gehenna and
Gehenna and ![]() Corpse) differ from the standard layouts. Each alternate floor has 11 unique layouts (12 in
Corpse) differ from the standard layouts. Each alternate floor has 11 unique layouts (12 in ![]() Downpour). Regular Secret Room layouts cannot appear on these floors.
Downpour). Regular Secret Room layouts cannot appear on these floors.
Super Secret Rooms[ | ]
![]()
![]() Super Secret Rooms are only located next to one other room, and this room can't be a Special Room; in other words, it is placed on one of the floor's dead ends, like any other Special Room. Each Super Secret Room has set drops depending on the floor. Note that the type of Super Secret Room is not limited to certain floors it mimics (e.g. Isaac can find a
Super Secret Rooms are only located next to one other room, and this room can't be a Special Room; in other words, it is placed on one of the floor's dead ends, like any other Special Room. Each Super Secret Room has set drops depending on the floor. Note that the type of Super Secret Room is not limited to certain floors it mimics (e.g. Isaac can find a ![]() Womb-themed Super Secret Room in
Womb-themed Super Secret Room in ![]() Depths).
Depths).
Super Secret Rooms are most likely to be found either at the end of a series of rooms that lead to a dead-end, and are particularly likely to appear near the ![]() Boss Room, as they are the second room type to be placed on a map during Map Generation, and are therefore placed far away from the room Isaac starts in. Because Shops are the third type of room generated, super secret rooms are also likely to spawn near the shop, and are likely to spawn in between the shop and the Boss Room.
Boss Room, as they are the second room type to be placed on a map during Map Generation, and are therefore placed far away from the room Isaac starts in. Because Shops are the third type of room generated, super secret rooms are also likely to spawn near the shop, and are likely to spawn in between the shop and the Boss Room.
Possible Layouts[ | ]
| ID | Weight | Room theme | Contents | Image preview |
|---|---|---|---|---|
| 0 | 1 | 8 random |
| |
| 1 | 1 | 1 |
| |
| 2 | 1 | 1 |
| |
| 3 | 1 | 1 |
| |
| 4 | 1 | 1 random trinket. | 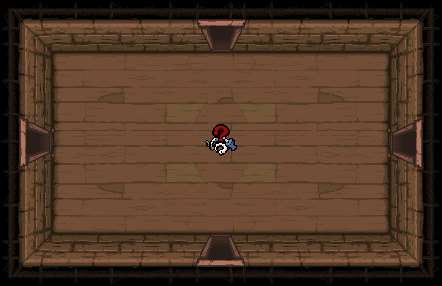
| |
| 5 | 1 | 5 random Pills. | 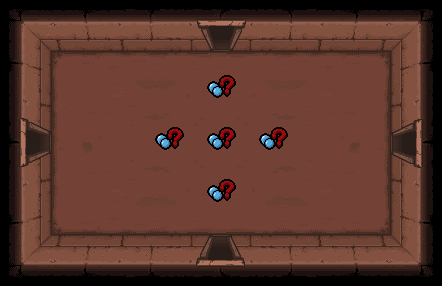
| |
| 6 | 1 |
| ||

| ||||
| 7 |
1 0.25 0.1 |
1 |
| |
| 8 |
1 0.5 |
1 |
| |
| 9 |
1 0.1 |
1 |
| |
| 10 |
1 0.25 0.5 |
Can contain any of the following: |
| |
| 11 |
1 | 4 |
| |
| 12 |
0.1 | 3 |
| |
| 13 |
0.1 | 3 |
| |
| 14 |
1 | 1 |
| |
| 15 |
0.1 | 1 Red Poop surrounded by 3 |
| |

| ||||
| 16 |
0.1 | 1 |
| |
| 17 |
0.1 | 1 |
| |
| 18 |
0.1 | 2 |
| |
| 19 |
0.1 | 1 |
| |
| 20 |
0.5 | 1 |
| |
| 21 |
0.5 | 1 |
| |
| 22 |
0.25 | 1 |
| |
| 23 |
0.5 | 1 Spiked Rock in each corner, and 3 |
| |
| 24 |
0.5 | 5 |
| |
| 25 |
0.25 | 1 pickup which has an 83% chance to be a |
| |
| 26 |
0.01 | 8 Urns, and 1 lit |
| |
| 27 |
1 | 1 |
| |
| 28 |
0.5 | 3 Urns in each corner, and 2 |
| |
| 29 |
0.25 | 4 Spikes, and 1 |

| |
| 30 |
0.25 | 1 |

| |
| 31 |
0.5 | 4 Rocks, and 2 |
| |
| 32 |
1 | 1 |
|
Greed Mode Layouts[ | ]
Greed Mode has its own set of Super Secret Room layouts.
| ID | Weight | Room theme | Contents | Image preview |
|---|---|---|---|---|
| 0 | 1 | 5 |
| |
| 1 | 1 | 5 |
| |
| 2 | 1 | 3 |
| |
| 3 | 1 | 3 |
| |
| 4 | 1 | 2 |
| |
| 5 | 1 | Library | 1 |
|
| 6 | 1 | 1 |
| |
| 7 | 1 | 1 |

| |
| 8 | 1 | 
| ||

| ||||
| 9 | 1 | 4 random Pills. | 
| |
| 10 | 1 | 2 random Cards. | 
| |
| 11 | 1 | 4 |

| |
| 12 | 1 | 2 random Runes. | 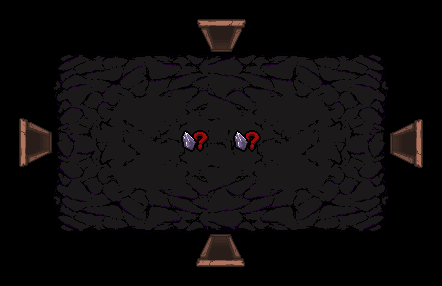
| |
| 13 | 1 | 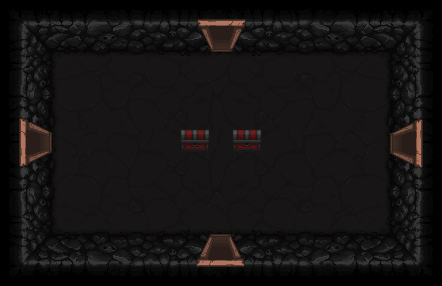
| ||
| 0.5 | 
| |||
| 14 | 1 | 2 random trinkets. | 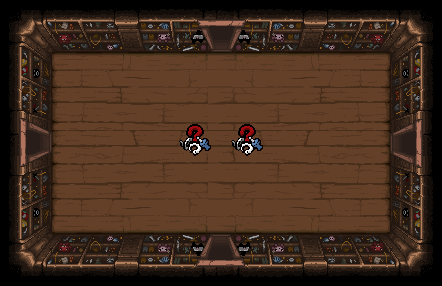
| |
| 15 | 1.0 0.5 |
1 random trinket. | 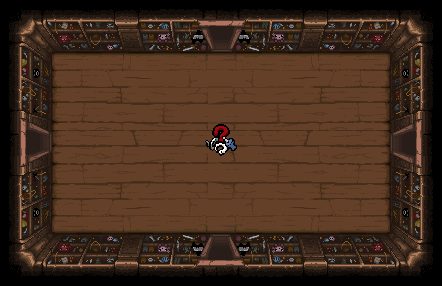
| |
| 16 | 1 | 1 bed. | 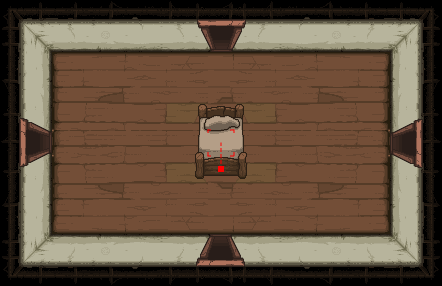
| |
| 17 | 1 | 1 trapdoor to the next floor. | 
| |
| 18 | 1 0.5 |
17 |
| |
| 19 | 1 0.25 |
1 |
| |
| 20 | 1 | 1 |
| |
| 21 | 1 0.25 |
1 |
| |
| 22 | 1 | 
| ||
| 23 | 1 | 2 |

| |
| 24 | 1 | 1 |

| |
| 25 | 1 0.1 |
1 |
| |
| 26 |
0.1 | 1 |
| |
| 27 |
0.5 | 1 Greed Mode Secret Room item surrounded by pits and 2 spike rocks that can fill up pits when destroyed from a certain direction. | 
|
Ultra Secret Rooms[ | ]
![]() Ultra Secret Rooms are special rooms that are not connected to any other room on the map directly. They are not revealed by most mapping effects (
Ultra Secret Rooms are special rooms that are not connected to any other room on the map directly. They are not revealed by most mapping effects (![]() The Mind, etc.) and can only be revealed on the map with
The Mind, etc.) and can only be revealed on the map with ![]() Cracked Orb,
Cracked Orb, ![]() Book of Secrets, wisps, and
Book of Secrets, wisps, and ![]() Rune Shard. They can be accessed directly by opening
Rune Shard. They can be accessed directly by opening ![]() Red Rooms adjacent to them using
Red Rooms adjacent to them using ![]() Red Key or Red Key wisps,
Red Key or Red Key wisps, ![]() Crystal Key,
Crystal Key, ![]() Cracked Key, and
Cracked Key, and ![]() Soul of Cain: entering a Red Room next to the Ultra Secret room will reveal its position and automatically open the doorway leading into it. It can also be entered by teleporting to it using
Soul of Cain: entering a Red Room next to the Ultra Secret room will reveal its position and automatically open the doorway leading into it. It can also be entered by teleporting to it using ![]() XVIII - The Moon?; when teleported into, a pathway of Red Rooms back to the rest of the level will be opened automatically. Ultra Secret rooms contain items from the Ultra Secret Room item pool.
XVIII - The Moon?; when teleported into, a pathway of Red Rooms back to the rest of the level will be opened automatically. Ultra Secret rooms contain items from the Ultra Secret Room item pool.
Common Ultra Secret Room locations
Ultra Secret rooms are most likely generated in spots that connect to 3+ non-red rooms through its adjacent red rooms (different squares in L rooms count as 2). They can be connected to 2 or 1 non-red rooms through its adjacent red rooms, but a specific 3+ room location is 11.5x more likely than a specific 2 room location, and 1 room locations being virtually impossible if there is a 3+ location available. If there is no 3+ room location available then a specific 2 room location is 11.5x more likely than a specific 1 room location.
Ultra Secret Rooms can't be connected to red rooms that connect to Secret Rooms, Super Secret Rooms, or ![]() Curse Rooms, and can't be in a location where any of its adjacent red rooms are invalid, such as next to a
Curse Rooms, and can't be in a location where any of its adjacent red rooms are invalid, such as next to a ![]() Boss Room (Boss Rooms in
Boss Room (Boss Rooms in ![]() The Void can have red rooms next to them, but the Ultra Secret Room will never be connected to one), next to the sides of narrow rooms, or any room that can't have a red room opened on that specific side, however locations on the 13x13 border where a red room would normally open to an
The Void can have red rooms next to them, but the Ultra Secret Room will never be connected to one), next to the sides of narrow rooms, or any room that can't have a red room opened on that specific side, however locations on the 13x13 border where a red room would normally open to an ![]() I AM ERROR room are allowed.
I AM ERROR room are allowed.
Notes[ | ]
- Generally, the best strategy for finding Ultra Secret Rooms is by checking a location that connects to at least 3 non-red rooms through its adjacent red rooms (in which all sides can have red rooms created, and isn't next to a Secret, Super Secret, or Curse Room), and if it's not in any 3+ locations, checking the spots connected to 2 rooms, then 1.
- When choosing which side to open from, the best way to increase your odds is to open the red room that connects to the highest number of other potential Ultra Secret Room locations.
- However, there is also value in choosing to open a red room that connects to an otherwise hard-to-access room, such as a Boss Challenge Room.
- However, there is also value in choosing to open a red room that connects to an otherwise hard-to-access room, such as a
- If the only remaining valid locations are connected to a single non-red room, it's just as likely for the Ultra Secret Room to be connected to the side of a single room as it is connected to a corner.
- When choosing which side to open from, the best way to increase your odds is to open the red room that connects to the highest number of other potential Ultra Secret Room locations.
- Curse of the Maze can move a room in a way that prevents creating a red room that connects to the Ultra Secret Room.
- The doors of the Ultra Secret Room are opened automatically only when approached from the outside. If other rooms exist adjacent to it, the doors will not open from inside the Ultra Secret Room without bombing them or returning from the outside.
- Red Key or Cracked Keys must be used before the bombs, as otherwise explosions won't have an effect.
- The Ultra Secret Room can generate north of the Mega Satan door, despite not being able to create a red room there.
- In the Mirrored World, the Ultra Secret Room will be empty, same as any Special Room.
- It's possible for the Ultra Secret Room to not generate if there are no valid locations.
Layouts[ | ]
| ID | Weight | Contents | Image preview |
|---|---|---|---|
| 0 | 1.0 | 2 |

|
| 1 | 1.0 | Several Key Blocks and Metal Blocks along the walls, and 1 Ultra Secret Room item. | 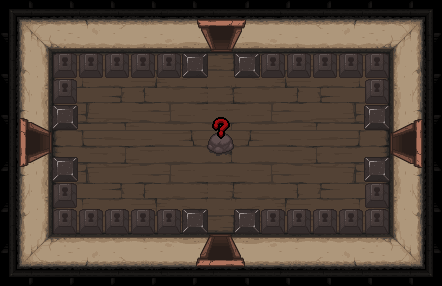
|
| 2 | 1.0 | 2 Shopkeepers, several Key Blocks, and 1 Ultra Secret Room item. | 
|
| 3 | 1.0 | 1 Shopkeeper behind Key Blocks, a few Cobwebs, and 1 Ultra Secret Room item blocked off by Key Blocks and Metal Blocks. | 
|
| 4 | 0.75 | 1 Shopkeeper, a few Cobwebs, and Rocks in the shape of a Key, with 1 Ultra Secret Room item inside the Key's 'loop'. | 
|
| 5 | 0.5 | 2 Shopkeepers, a few Cobwebs, several Urns, 3 random Coins, and 4 |

|
| 6 | 0.25 | 10 Shopkeepers, 2 |
|
| 7 | 0.1 | 2 Shopkeepers, some Cobwebs, a Rock, 10 |
|
| 8 | 1.0 | 1 Shopkeeper, some Cobwebs, 1 Key Block in each corner, and an item between some Retractable Spikes. | 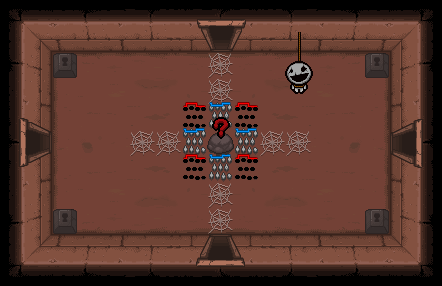
|
Notes[ | ]
- Secret Rooms are found by bombing the middle of a wall in a standard size room. For larger size rooms, divide the room mentally into the size of individual rooms to figure out where to bomb.
- One easy strategy to place the bomb correctly in large rooms is to position Isaac in a corner, walk along a wall, then place the bomb at the spot where the camera starts moving.
- For closet-size rooms, Secret Rooms will never be found by bombing the sides but may be found by bombing the wall at the end of the closet.
- Rooms adjacent to Secret Rooms will always have a clear, walkable path to the middle of the wall where Isaac can place a bomb. Secret Room entrances are never found in front of gaps, obstacles, spikes, or places that enemies spawned when the room was originally entered. Each room adjacent to a Secret Room must satisfy these requirements, so if one room near a suspicious gap in the map fails these requirements, then look elsewhere.
- Secret Rooms are equally as likely to be in a valid location with 3 neighbors, as it is with 4 neighbors. 2 neighbor locations are rare but possible, even when there are locations with 3+ neighbors available. 1 neighbor locations can only happen if there are no valid 3+ neighbor locations, and are very rare.
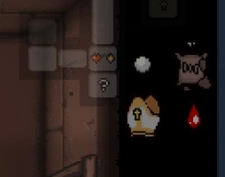
A secret room adjacent to only one room
- X-Ray Vision opens all available entrances to both the Secret Room and the Super Secret Room. The I Can See Forever pill does the same for the floor on which the pill was used. Dog Tooth will play a howl sound effect when Isaac enters a room adjacent to a Secret Room or Super Secret Room, and YO LISTEN! will hover over Secret Room entrances.
- Teleportation items can randomly teleport Isaac into Secret Rooms, and XVIII - The Moon will always teleport Isaac to the Secret Room.
- Secret Rooms are revealed on the map with Blue Map, Book of Secrets, Crystal Ball, The Mind, Spelunker Hat, XIX - The Sun, or XXI - The World, but Isaac will still need to open their entrance.
- Red Key can be used to find Secret Rooms. The lack of Red door frame means a Secret Room could have generated on the other side.
- Star of Bethlehem sometimes reveals Secret Rooms as it can travel through them.
- If Greed or Super Greed spawn inside a Secret Room, Isaac won't be able to exit it (like a Mini-Boss Room), but once the fight ends, all the exits of the Secret Room will be accessible.
- An exception to this is that Challenge Rooms and Boss Challenge Rooms will be inaccessible; the metal bars won't be removed from walls that lead to them after the fight concludes.
- An exception to this is that
- Secret Rooms can exist next to all types of rooms except Boss Rooms, Super Secret Rooms, and other Secret Rooms; allowing certain restricted rooms to be entered.
- Even if Isaac has no Keys, it is possible to bomb into a locked Special Room should there exist an adjacent Secret Room. Leaving through the door will unlock the room without requiring a Key.
- It is possible to enter Curse Rooms without taking damage by bombing in from a Secret Room.
- It is possible to access Challenge Rooms even if Isaac doesn't meet the health requirements, but it is not possible to "steal" the items, as the hole will be blocked up as soon as the fighting stage begins.
- Secret Rooms of all types do not exist in the Ascent.
- Once Corrupted Data is achieved (beating Delirium as Tainted Eden), items that spawn in Secret Rooms have a chance to be "glitched" as if affected by TMTRAINER.
- Super Secret Rooms replace the dead-end room that would require the 2nd most rooms walked through from the start room to access, and cannot be connected to the Secret Room.
- For reference, the Boss Room takes the dead-end room that would require the most rooms walked through, and the Shop takes the room that would require the 3rd most. This means that the Super Secret Room is equally as far or further from the start room than the Shop. It also means the Super Secret Room tends to be close to the Boss Room. Loops and large rooms connected to more than one room on any given side can tamper with this logic, however.
- Sometimes, the Boss Room will not be the furthest dead-end room; usually, in these cases, the Boss Room has one side blocked off and the Super Secret Room will be connected to the furthest normal room, with the wall leading to it being on the opposite side of the blocked off side in the Boss Room.
- For example, if the blocked off side in the Boss Room is to the north, the Super Secret Room will be to the south of the furthest normal room.
- For reference, the
- Super Secret Rooms can have layouts with themes from floors that Isaac hasn't unlocked yet.
Trivia[ | ]
- In the original The Binding of Isaac, Secret Rooms worked differently; if the player left a room after opening a Secret Room entrance, the entrance would disappear. To access the room again for any purpose, the player needed another Bomb to reopen the entrance.
- For some reason, Challenge Rooms and Boss Challenge Rooms still work this way.
- For some reason,
- Prior to V1.7.5, Ultra Secret Rooms used the Angel Room Item Pool. This was meant as a placeholder.
Bugs[ | ]
| After defeating an Angel spawned in a Super Secret Room, the music will not return to the floor's regular music. |
| After fighting Greed/Super Greed spawn inside a Secret Room, if there is an adjacent Challenge Room or Boss Challenge Room, the metal bars from the Greed/Super Greed fight will not disappear after the fight has ended, making it impossible to enter the Challenge/Boss Challenge room this way. |
References[ | ]
| Unlocked | Boss Room |
Mini-Boss Room |
Curse Room |
Sacrifice Room |
Closet |
Grave Room |
|---|---|---|---|---|---|---|
| Locked | Treasure Room |
Shop |
Library |
Planetarium |
||
| Slotted | Arcade |
|||||
| Barred | Challenge Room |
Boss Challenge Room |
||||
| Double-locked | Vault |
Dice Room |
||||
| Double-boarded | Clean/Dirty Bedroom |
|||||
| Hidden | Secret Room |
Super Secret Room |
Crawl Space |
Black Market |
I AM ERROR |
Ultra Secret Room |
| Post-boss | Devil Room |
Angel Room |
Boss Rush |
Blue Womb Entrance |
||